Conway's Game of Life on Ethereum based on Randomness provided by a Chainlink Oracle


The Big Picture
In this step-by-step tutorial I build a smart contract from scratch and deploy it to Ethereum's Rinkeby Test Network. The smart contract will use Chainlink to get a verified random number and I will turn the generated number to a board of Conway's Game of Life using React. Here is a short demo:
The full code is available on Github .
Software Versions
- OS: Ubuntu 20.04.2 LTS
- node: v14.15.4
- npm: 6.14.10
- Truffle: v5.1.59
Creating and deploying the first smart contract
Make a directory and name it game_of_life. Inside it execute the following command: npx create-react-app game to create React frontend application with the name of game. As backend, we will use Ethereum's smart contracts, so we need Truffle . With Truffle we can compile and deploy smart contracts. Enter the game folder and type truffle init which gives us everything we need to work with smart contracts.
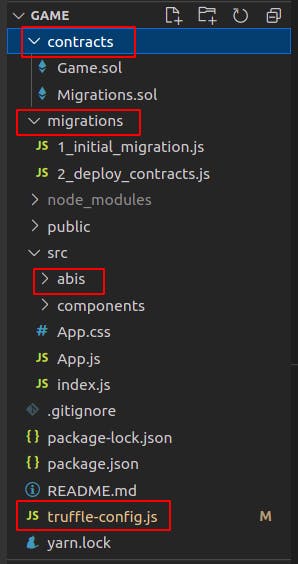
- The folder
contractis the place for well, contracts.Migration.solis automatically generated by Truffle - The folder
migrationsis for deployment-scripts. - The folder
abisis the place where the ABI json files (generated during the compilation process based on the contracts) are. We need these ABI files to interact with the contract. This folder and its content appear only aftertruffle compile. - The file
truffle-config.jsis where we can configure truffle.
We will need a bunch of dependencies later
    "@chainlink/contracts": "^0.1.6",
    "truffle": "^5.2.3",
    "truffle-hdwallet-provider": "^1.0.17",
    "web3": "^1.3.4",
so add them to package.json and hit npm install. After that you can replace the content of truffle-config.js with the following:
var HDWalletProvider = require("truffle-hdwallet-provider");

const mnemonic = "apple orange banana.... here comes your Metamask mnemonic ";
module.exports = {
  networks: {
    development: {
      host: "127.0.0.1",
      port: 7545,
      network_id: "*" // Match any network id
    },
    rinkeby: {
      provider: function () {
        return new HDWalletProvider(mnemonic, "https://rinkeby.infura.io/v3/HERE_COMES_INFURA_PROJECT_ID");
      },
      network_id: 4,
    }
  },
  contracts_build_directory: './src/abis/',
  compilers: {
    solc: {
      version: "0.6.6",
      optimizer: {
        enabled: true,
        runs: 200
      }
    }
  }
}
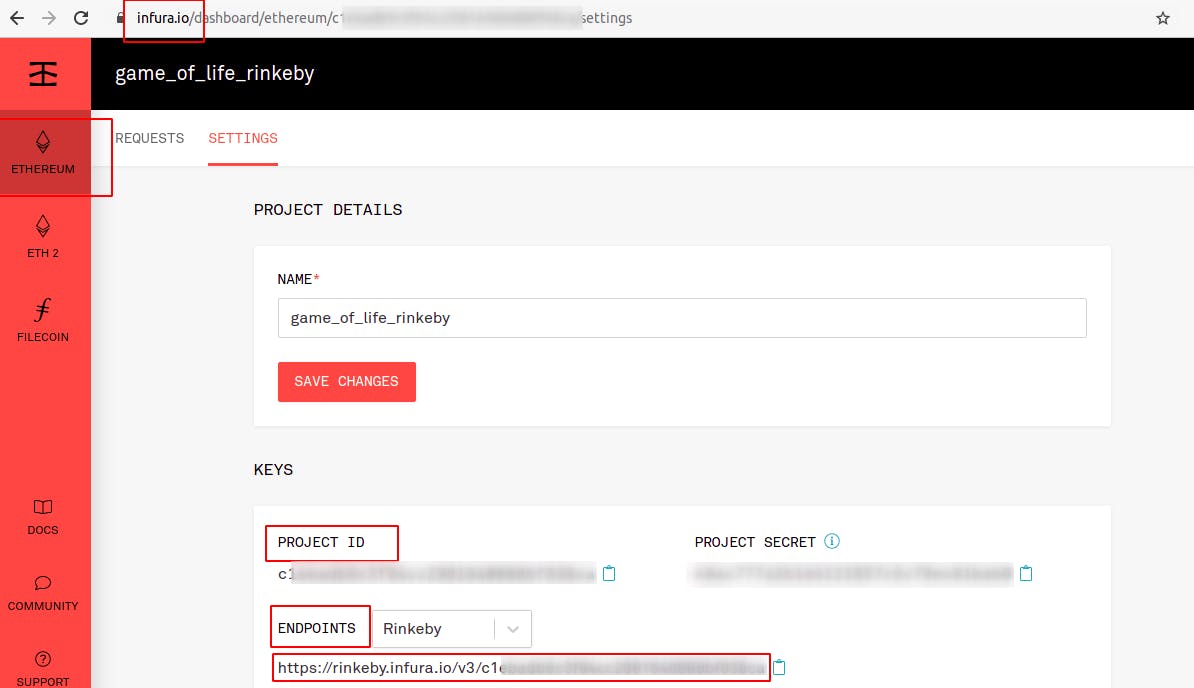
As you can see, the HDWalletProvider needs Infura. Infura is a company and they enable anyone to use the Ethereum Network without installing and maintaining an Ethereum node. Register on their website and create a project like this:
The HDWalletProvider also needs access to your Metamask, that's why you need to provide your Metamask-mnemonic.If you are like me and have already forgotten them long time ago here is where you can find them:
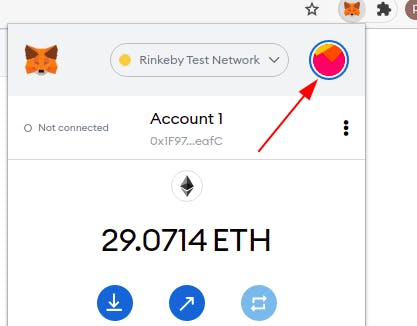 Click on the circle above then click on
 Settings then click on Security and Privacy and then click on Reveal Seed Phrase.
Now it's time to create a contract. The language for smart contracts is solidity. I believe that anyone with some javascript or maybe java knowledge can decipher the meaning of a simple contract. I am not saying that solidity is java or javascript but I do say that if you have some years of javascript experience the transition to solidity should not be super bumpy.
Create a file named Game.sol inside the contracts folder with the following content:
pragma solidity 0.6.6;

contract Game {
    string public name = "Game of Life";
}
Create another file named 2_deploy_contracts.js inside the migration folder with the following content:
const Game = artifacts.require("Game");

module.exports = function (deployer, network, accounts) {
    deployer.deploy(Game, { from: accounts[0] });
};
Before we compile and deploy we need to fund our Metamask Account with Rinkeby Test Ether.
Go to this link and follow their instructions.
Now we can compile our smart contracts with truffle compile. The compilation creates json files based on the compiled contracts inside src/abis. Deployment is called migration so we deploy our contract to the rinkeby test network with the following truffle command:
truffle migrate --reset --network rinkeby.
Reset is not necessary for the first time but essential for later deployments therefore I leave it there. The deployment takes a certain amount of time but when its done we can start a console to interact with our contract:
truffle console --network rinkeby.
Here in this world (almost) everything takes time so we should never forget the await keyword:
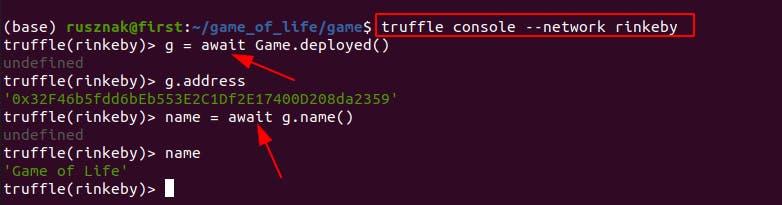
This is how we can deploy any contract to any network.
Accessing the deployed contract with React.
Replace the content of App.js with the following:
import React, { useEffect, useState } from 'react';
import Web3 from 'web3'
import Game from './abis/Game.json'

function App() {
  const [gameContract, setGameContract] = useState();
  const [account, setAccount] = useState();
  const [balance, setBalance] = useState();
  const [name, setName] = useState();

  const loadWeb3 = async () => {
    if (window.ethereum) {
      window.web3 = new Web3(window.ethereum)
      await window.ethereum.enable()
    }
    else if (window.web3) {
      window.web3 = new Web3(window.web3.currentProvider)
    }
    else {
      window.alert('Non-Ethereum browser detected. You should consider trying MetaMask!')
    }
  };

const loadBlockchainData = async () => {
    const web3 = window.web3
    const networkId = await web3.eth.net.getId()
    if (networkId !== 4) {
      window.alert('Please switch network to the Rinkeby and refresh the page')
    }
    const networkData = Game.networks[networkId];
    if (networkData) {
      const contract_address = networkData.address;
      const deployedContract = new web3.eth.Contract(Game.abi, contract_address);
      setGameContract(deployedContract);
      const accounts = await web3.eth.getAccounts();
      setAccount(accounts[0])
      const bal = await web3.eth.getBalance(accounts[0]);
      setBalance(bal);
    } else {
      alert("Wrong NETWORK")
    }
  }

  useEffect(() => {
    const load = async () => {
      await loadWeb3()
      await loadBlockchainData()
    }
    load();
  }, []);

  return (
    <div>
      <p>Address: {gameContract?._address} </p>
      <p>Account: {account} </p>
      <p>Balance: {balance} </p>
      <p>Name: {name} </p>
    </div>
  );
}

export default App;
The useEffect hook is in this form just a modern way to say componentDidMount().
useEffect(() => {
...
...
}, []);
The loadWeb3 is just a copy-past from Metamask, it checks whether our browser is compatible and if it's not the case it recommends using Metamask.
The loadBlockchainData checks the network (Rinkeby in this case), establishes the connection to the deployed contracts, and fills the useState hooks. The important thing here is that we need an ABI and an address to interact with any smart contract. ABIs are generated by truffle compile. ABI stands for Application Binary Interface and it is basically a Json file containing all the functions and variables of a smart contract.
Getting a Random Number
In the world of blockchain everything is highly deterministic so getting a random number is tricky. That's why we need to use Chainlink here. Chainlink, a decentralized oracle network, was developed to allow smart contracts to automate the transfer of data between blockchains and outside systems in a highly secure and reliable manner. It uses a similar model to a blockchain in that there is a decentralized network of independent entities (oracles) that collectively retrieve data from multiple sources, aggregate it, and deliver a validated, single data point to the smart contract to trigger its execution, removing any centralized point of failure. Chainlink provides a randomness solution called VRF, which generates randomness and delivers it to the smart contract in a manner where users can prove it is fair and unbiased, as neither the players, game creators, or external entities can tamper with or manipulate the randomness to their advantage.
Replace Game.sol with the following:
pragma solidity 0.6.6;

import "@chainlink/contracts/src/v0.6/VRFConsumerBase.sol";

contract Game is VRFConsumerBase {
    uint256 internal fee;

    //Network: Rinkeby
    address constant VFRC_address = 0xb3dCcb4Cf7a26f6cf6B120Cf5A73875B7BBc655B; // VRF Coordinator
    address constant LINK_address = 0x01BE23585060835E02B77ef475b0Cc51aA1e0709; // LINK token

    bytes32 internal constant keyHash =
        0x2ed0feb3e7fd2022120aa84fab1945545a9f2ffc9076fd6156fa96eaff4c1311;

    event Result(uint256 randomResult, uint256 time);

    /**
     * Constructor inherits VRFConsumerBase
     */
    constructor() public VRFConsumerBase(VFRC_address, LINK_address) {
        fee = 0.1 * 10**18; // 0.1 LINK
    }

    /**
     * Requests randomness from a user-provided seed
     */
    function getRandomNumber(uint256 userProvidedSeed)
        public
        returns (bytes32 requestId)
    {
        require(
            LINK.balanceOf(address(this)) > fee,
            "Not enough LINK - fill contract with faucet"
        );
        return requestRandomness(keyHash, fee, userProvidedSeed);
    }

    /**
     * Callback function used by VRF Coordinator
     */
    function fulfillRandomness(bytes32 requestId, uint256 randomness)
        internal
        override
    {
        emit Result(randomness, block.timestamp);
    }
}
Basically I got this contract from their website and modified it to use Rinkeby instead of Kovan.
Recompile and redeploy the contract.
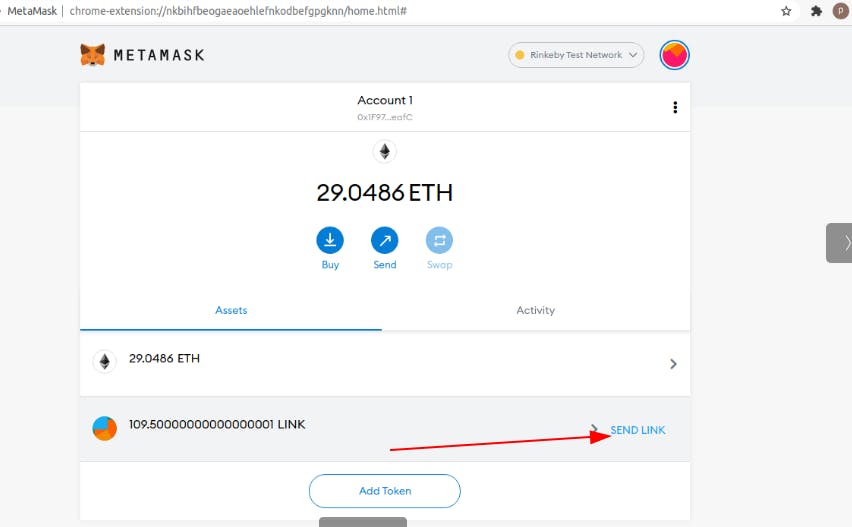
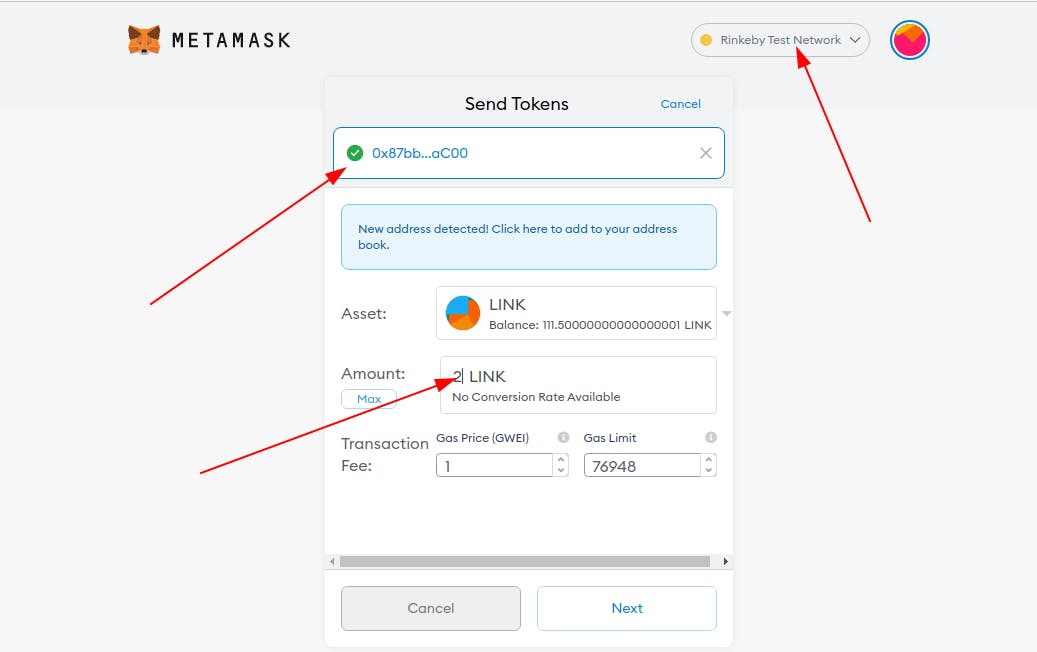
In order to be able to use Chainlink's services we need their Link Tokens. Go to their faucet and send tokens to your account. After that send some tokens from your address to the address of the deployed contract (the contract will call chainlink, after all).
Finally add a button to App.js
      <button
        type="submit"
        className="btn btn-success btn-lg"
        onClick={(event) => {
          event.preventDefault()
          setRandomResult(null)
          getRandom()
        }}>
        Get Random Number
      </button>
This button calls a function named getRandom() which also needs to be added:
const getRandom = () => {
    //randomSeed will be component of which final random value will be generated
    let randomSeed = Math.floor(Math.random() * Math.floor(1e9))
    gameContract.methods.getRandomNumber(randomSeed)
      .send({ from: account })
      .on('transactionHash', (hash) => {
        gameContract.events.Result({}, (error, event) => {
          setRandomResult(event.returnValues.randomResult);
        })
      }).on('error', (error) => {
        console.log(error);
      })
  }
which calls the contract. The contract calls Chainlink and chainlink supplies a random number.
We also need a useState hook for this value:
const [randomResult, setRandomResult] = useState();
and
setRandomResult(event.returnValues.randomResult);
and now we can display it onscreen:
<p>Random: {randomResult} </p>
Turning the Random Number to a Game
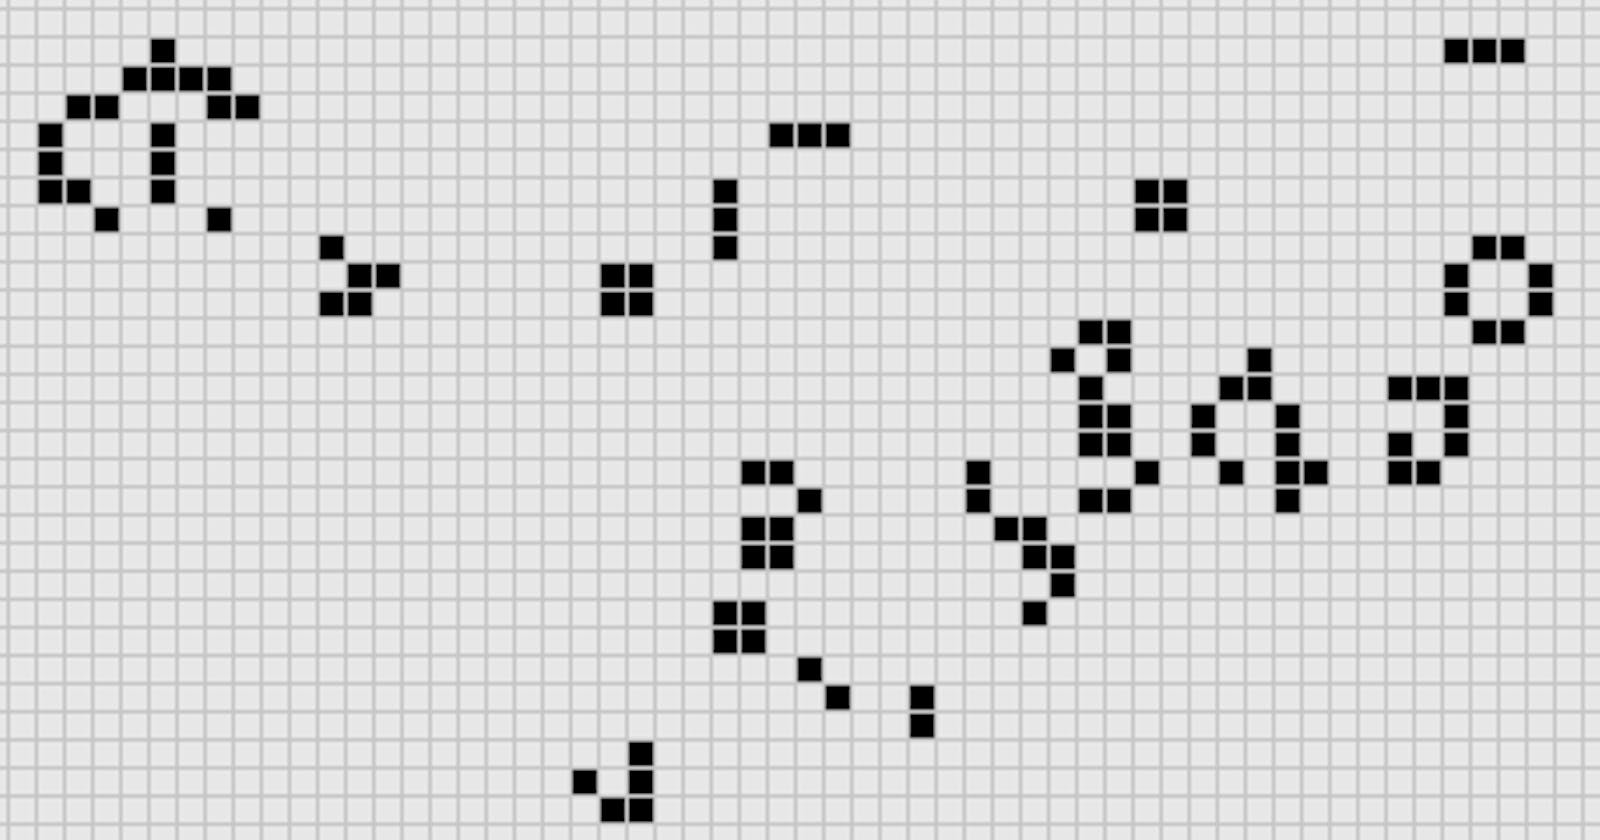
The Random Number generated by Chainlink has 77 digits and looks something like this:
87993779061620307839679677274994846575221862530459792902542227382773306624529
My logic to turn it to a Game of Life Board is to use the modulo operator (% 2) on each digit. Odd digits will represent a dark square whereas even digits remain white. This would allow the use of a 9X9 grid where the last 4 squares stay white (81 - 77 = 4). To get a somewhat bigger (13 X 13) board I use some additional rows and columns as padding.
Below is the full code of ConwaysGridComponent.js
import React, { useState } from 'react';

const ConwaysGridComponent = ({ randomResult }) => {
    const SIZE = 20
    const PADDING_FIELDS = 7;
    const NUM_ROWS = PADDING_FIELDS + 9 + PADDING_FIELDS;
    const NUM_COLS = PADDING_FIELDS + 9 + PADDING_FIELDS;
    let counter = 0;

    // counts the number of the dark squares
    const countDarkSquare = (grid) => {
        let dark = 0;
        for (let i = 0; i < grid.length; i++) {
            for (let j = 0; j < grid[0].length; j++) {
                if (grid[i][j] === 1) {
                    dark++;
                }
            }
        }
        return dark;
    }

    //check the Rules of Conway's Game of Life
    const checkRules = (i, j) => {
        const width = grid.length;
        const height = grid[0].length;
        const iLess = i - 1 < 0 ? width - 1 : i - 1;
        const iBigger = i + 1 >= width ? 0 : i + 1;
        const jLess = j - 1 < 0 ? height - 1 : j - 1;
        const jBigger = j + 1 >= height ? 0 : j + 1;
        const current = grid[i][j];

        const numberOfNeighbours =
            grid[iLess][jLess] +
            grid[iLess][j] +
            grid[iLess][jBigger] +
            grid[i][jLess] +
            grid[i][jBigger] +
            grid[iBigger][jLess] +
            grid[iBigger][j] +
            grid[iBigger][jBigger]
        if (current === 1 && (numberOfNeighbours === 2 || numberOfNeighbours === 3)) {
            return 1;
        }
        if (current === 0 && numberOfNeighbours === 3) {
            return 1;
        }
        return 0;
    }

    //Replaces the old grid with anew one when the player clicks on
    // Play Button
    const startPlaying = () => {
        const newRows = [];
        for (let i = 0; i < NUM_ROWS; i++) {
            const newCols = [];
            newRows.push(newCols);
            for (let j = 0; j < NUM_COLS; j++) {
                newCols.push(checkRules(i, j));
            }
        }
        setGrid(newRows);
    }

    const simplify = (num) => {
        if (num % 2 === 1) {
            return 1;
        }
        return 0;
    }

    //Hook to initialize the grid based on the random number.
    const [grid, setGrid] = useState(() => {
        const rows = [];
        for (let i = 0; i < NUM_ROWS; i++) {
            const cols = [];
            rows.push(cols);
            for (let j = 0; j < NUM_COLS; j++) {
                if (i < PADDING_FIELDS || i >= NUM_ROWS - PADDING_FIELDS || j < PADDING_FIELDS || j >= NUM_COLS - PADDING_FIELDS) {
                    cols.push(0)
                    continue;
                }
                cols.push(simplify(randomResult[counter]));
                counter++;
            }
        }
        return rows;
    });

    return (
        <div>
            <p>Dark:  {countDarkSquare(grid)} </p>
            <div style={{
                display: "grid",
                gridTemplateColumns: `repeat(${NUM_COLS}, ${SIZE}px)`
            }}>
                {grid.map((row, i) =>
                    row.map((col, j) => (
                        <div key={`${i}+${j}`}
                            style={{
                                width: SIZE,
                                height: SIZE,
                                backgroundColor: grid[i][j] === 1 ? "grey" : "white",
                                border: "solid 1px black",
                            }}>
                        </div>
                    ))
                )}
            </div>

            <button
                type="submit"
                className="btn btn-success btn-lg"
                onClick={(event) => {
                    event.preventDefault()
                    startPlaying()
                }}> Start Playing
            </button>
        </div>
    )
}
export default ConwaysGridComponent;
The rules of the game are enforced by the checkRules() function. Whenever the user clicks on the Start Playing button the old grid gets replaced by a new one calculated based on the rules. The function which is responsible for this is also called startPlaying.
With this, we are at the end of this tutorial. Congrats. Now you know how to create and deploy a smart contract and how to get a random number in blockchain environment as well as how to turn it into something fun.