E-commerce site which takes Ethereum Tokens. Full tutorial with Hardhat, MongoDB, Express, Angular. Frontend, Backend, Deployment.

I am a Professional Software Developer. On the backend side I work with Java on the frontend side I use React or Angular. Recently I made my baby steps in the fields of Machine Learning (mainly fast.ai) and Blockchain (Ethereum, Chainlink, Internet Computer(Dfinity)). This is where my professional interest lies.
The Big Picture
In this detailed, step-by-step tutorial I am going to create a webshop for digital goods where customers can pay with Ethereum Tokens. Our webshop will have an Angular frontend, an Express.js backend and a MongoDB database. Because we want to accept payments on the Ethereum Network we also need deployed smart contracts. The whole together is quite a complex application. It contains three parts; frontend, backend and smart contracts. Therefore we also need three distinct packege.json files (i.e. three separate npm install-s ) containing the dependencies for each.
How it works
When a customer clicks on the Purchase link, the frontend calls the backend server which calls the database and a new entry will appear in the database persisting a boolean value (among other values, obviously) which shows that the purchase is not yet paid. Parallel to this the buyer is requested to send tokens to the smart contract. The smart contract immediately forwards the tokens to the account of the shop owner and emits an event indicating that the payment is in. This event will be intercepted by the backend server. Then the backend server goes ahead finding the corresponding database entry and marks it paid. Finally, the backend server returns a response which contains the URL for downloading the purchased item and the frontend displays this URL.
The full code is available on GitHub.
Software versions:
- OS: Ubuntu 20.04.2 LTS
- node: v14.15.4
- npm: 6.14.10
- Angular CLI: 11.2.2
- Docker: 20.10.3
- docker-compose 1.28.2
- MongoDB is not installed on my Computer, it runs only inside a Docker Container.
Creating the Smart Contracts
Let's start with installing hardhat and other dependencies:
mkdir webshop
cd webshop
npm init --yes
npm install --save-dev hardhat @nomiclabs/hardhat-ethers @nomiclabs/hardhat-waffle ethereum-waffle @openzeppelin/contracts
npm install ethers
Create your Hardhat project by running: npx hardhat.
Then pick Create a sample project.
Then change the version of solidity to "0.8.0" in hardhat.config.js like this:
require("@nomiclabs/hardhat-waffle");

module.exports = {
  solidity: "0.8.0",
};
Now it's time to write the contract(s). The language for smart contracts is solidity. At the first glance the code written in solidity roughly resembles javascript but the language is typed. It also have some weird features like msg.sender or require or weird keywords like external. Nevertheless I believe that anyone with some javascript or maybe java knowledge can decipher the meaning of a smart contract. I am not saying that solidity is java or javascript but I do say that if you have some years of javascript experience the transition to solidity should not be super bumpy.
The right place for contracts, is, well, the folder called contracts. Remove the auto generated Greeeting.sol contract from there. Our first contract is called PaymentProcessor.sol. It has a function pay() that can only be called from outside of this contract, hence the external modifier. This function uses the ERC20 Token's transferFrom() function to transfer money from the buyer's address to that of the shop's owner. Because our contract spends the money of the buyer (as opposed to the buyers spending it themselves) the process needs approval from the buyer. A wallet like Metamask will ask the buyer to approve the transaction. Finally, the pay() function will emit an event which will contain all the details of the transaction like payer's address, the paid amount, id of payment and timestamp. Below is the full contract:
pragma solidity ^0.8.0;

import "@openzeppelin/contracts/token/ERC20/IERC20.sol";

contract PaymentProcessor {
    address public shopOwnerAddress; // address of the Shop Owner
    IERC20 public dai;

    //emitted by pay(). Intercepted by backend server
    event PaymentDone(
        address payer,
        uint256 amount,
        uint256 paymentId,
        uint256 date
    );

    constructor(address adminAddress, address daiAddress) {
        shopOwnerAddress = adminAddress;
        dai = IERC20(daiAddress);
    }

    function pay(uint256 amount, uint256 paymentId) external {
        dai.transferFrom(msg.sender, shopOwnerAddress, amount);
        emit PaymentDone(msg.sender, amount, paymentId, block.timestamp);
    }
}
The second contract is Dai.sol. It is only necessary for testing. On the Ethereum Mainnet we would use the real DAI. But on our local test networks like the built-in Hardhat Network or Ganache we need to create our own. This is an ERC20 Token.
The main difference between fungible tokens like this and cryptocurrencies is that cryptocurrencies have their own blockchain while tokens are built on top of an existing blockchain. For example, ETH is a cryptocurrency built on the Ethereum blockchain, but anyone can create their own token on Ethereum to represent a new kind of asset. Below the full code:
pragma solidity ^0.8.0;

import "@openzeppelin/contracts/token/ERC20/ERC20.sol";

//Dai stablecoin clone for testing purposes
contract Dai is ERC20 {
    constructor() ERC20("Dai", "DAI") {}

    function faucet(address to, uint256 amount) external {
        _mint(to, amount);
    }
}
Deploying the Smart Contracts
Remove whatever auto-generated file exists in scripts folder. and create a file with the name of deploy.js there.
It starts with setup, logging:
async function main() {
    const [deployer, buyer] = await ethers.getSigners();
    console.log(
        "Deploying contracts with the account:",
        deployer.address
    );
and continues with the deployment of Dai. I am assuming that you deploy to local network. If not, just skip this part and deploy PaymentProcessor with the hard coded Mainnet DAI address.
    console.log("Account balance:", (await deployer.getBalance()).toString());
    const daiFactory = await ethers.getContractFactory("Dai");
    const daiContract = await daiFactory.deploy();
    console.log("Dai Contract address:", daiContract.address);
Then we fund buyer's address with Dai:
    await daiContract.faucet(buyer.address, ethers.utils.parseEther('5000'));
    const balance = await daiContract.balanceOf(buyer.address)
    console.log("Buyer's DAI balance:", ethers.utils.formatEther(balance))
Then we deploy PaymentProcessor:
    const ppFactory = await ethers.getContractFactory("PaymentProcessor");
    const paymentProcessor = await ppFactory.deploy(deployer.address, daiContract.address);
    console.log("PaymentProcessor's Address", paymentProcessor.address)
and finally we do some logging and call main():
    console.log("Shop Owner's Address", deployer.address)
    console.log("Buyer Address", buyer.address)
}
main()
    .then(() => process.exit(0))
    .catch(
        error => {
        console.error(error);
        process.exit(1);
        }
    );
Now we need to start the blockchain. To do this type: npx hardhat node. It spits out 10 accounts with private keys, the first one is the deployer (and the shop's owner), the second one will be the buyer. Then deploy the contracts:
npx hardhat run --network localhost scripts/deploy.js
The result should be something like this:
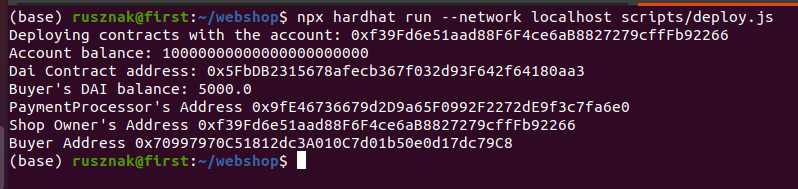
Now our blockchain is running and our contracts are deployed. Now it's time to create the database and the backend server.
Creating the Database (with Docker)
We could download and install MongoDB but I don't want to litter my computer with unnecessary installations, therefore I am going to use docker to run a MongoDB container. The only thing that we need to keep in mind is persisting data between container restarts. For this reason we need to use volumes.
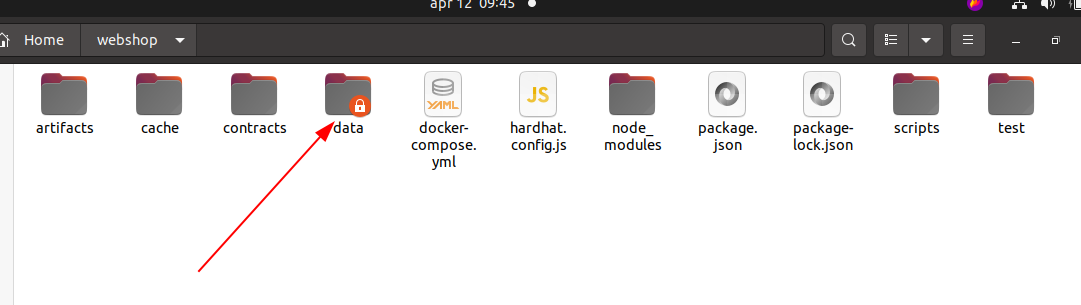
Create a file and name it docker-compose.yml. Its content should be as follows:
version: '3'
services:
  mongo:
    container_name: mongo
    image: mongo
    ports:
      - '27017:27017'
    volumes:
      - './data:/data/db'
volumes:
  mongodb:
This creates a folder called data and the content of the database survives there even when the docker container is down and the database is not available.
I already have the latest MongoDB image but even if you don't I believe running the yml file downloads one and creates and starts the container:
docker-compose up
Creating the Backend Server
Let's start with installing more dependencies:
mkdir backend
cd backend
npm init --yes
npm install cors express mongoose
db.js
We need a file here which is responsible for connecting to the database. Let's call it db.js.
It requires mongoose:
const mongoose = require('mongoose')
and connects to the database:
mongoose.connect(
    'mongodb://localhost:27017/mongo',
    {
        useNewUrlParser: true,
        useUnifiedTopology: true
    }
).then(
    () => console.log('MongoDB Connected')
).catch(
    err => console.log(err)
);
and creates a Schema like below. This very basic schema contains only the bare essentials; which are the id of each entry, another String value called itemId, and a boolean value indicating whether it is paid or not.
const paymentSchema = new mongoose.Schema({
    id: String,
    itemId: String,
    paid: Boolean
});
We also need to make the schema available from outside this file:
const Payment = mongoose.model('Payment', paymentSchema);
module.exports = {
    Payment
}
server.js
Furthermore we need another file for server. Let's call it server.js.
It starts with the necessary imports:
var express = require('express')
var cors = require('cors')
var app = express()
const ethers = require('ethers');
const PaymentProcessor = require('../artifacts/contracts/PaymentProcessor.sol/PaymentProcessor.json');
const { Payment } = require('./db.js')
Our app listens on port 4000. Don't forget cors. Without it won't work.
app.use(cors())
app.listen(4000, function () {
    console.log('CORS-enabled web server listening on port 4000')
})
Let's create an endpoint. The users call this endpoint via frontend when they pick an item to buy. It creates a new entry in the database and returns the generated id of the payment.
let paymentId = 300;

app.get('/api/getPaymentId/:id', async function (req, res) {
    paymentId++;
    await Payment.create(
        {
            id: paymentId,
            itemId: req.params.id,
            paid: false
        }
    );
    res.json({ paymentId })
});
Let's try it out.
Make sure that the database is running. If not : docker-compose up
Start the server: node server.js. This should result this:
 Call the endpoint:
curl http://localhost:4000/api/getPaymentId/2. This should result this:

We also need a function that constantly listens of the events on the blockchain and whenever our PaymentProcessor contract emits a PaymentDone event, it finds the corresponding record in the database and sets paid to true.
const contract_address_local = "0x9fE46736679d2D9a65F0992F2272dE9f3c7fa6e0" //local
const listenEvents = () => {
    const provider = new ethers.providers.JsonRpcProvider('http://localhost:8545');
    const paymentProcessor = new ethers.Contract(
        contract_address_local,
        PaymentProcessor.abi,
        provider
    );
    paymentProcessor.on('PaymentDone', async (payer, amount, paymentId, date) => {
        const payment = await Payment.findOne({ id: paymentId })
        if (payment) {
            payment.paid = true;
            await payment.save();
        }
    });
}
listenEvents()
Finally, we need another endpoint to return the downloadable Url if the payment is already paid. Obviously in real life the requested urls should be coming from the database.
const items = {
    '1': { id: 1, url: "http://urlToDownloadPurchasedBook_1.pdf" },
    '2': { id: 2, url: "http://urlToDownloadPurchasedBook_2.pdf" },
}
app.get('/api/getUrl/:paymentId', async function (req, res) {
    const payment = await Payment.findOne({ id: req.params.paymentId })
    if (payment && payment.paid === false) {
        res.json({ url: items[payment.itemId].url });
    } else {
        res.json({ url: "" });
    }
});
Creating Frontend
Let's create a new Angular project: ng new frontend.
To be able to import json files we need to add following lines to tsconfig.json under CompilerOptions:
"compilerOptions": {
    ....
    "resolveJsonModule": true,
    "esModuleInterop": true,
  },
We can access the smart contracts as follows. In app.component.ts we add the following imports and the contract addresses:
import { Component } from '@angular/core';
import { ethers, providers, Contract } from 'ethers';
import PaymentProcessor from '../../../artifacts/contracts/PaymentProcessor.sol/PaymentProcessor.json';
import Dai from '../../../artifacts/contracts/Dai.sol/Dai.json';

declare const window: any;
const pp_address = '0x9fE46736679d2D9a65F0992F2272dE9f3c7fa6e0';
const dai_address = '0x5FbDB2315678afecb367f032d93F642f64180aa3';
Because we compiled and deployed the contracts with hardhat I could not find a more elegant way to have the contracts' addresses than to hard-code them. With truffle there is a way to get it from the compiled json file. I could get them from .env but I try to keep things simple. If someone knows better way (i.e. truffle-style better way, getting it from abi or something similar) please tell me in the comments.
In Angular ngOnInit() is almost like a constructor, it runs only once when the component is loaded. It is the perfect place to initialize our contracts:
contracts: any = [];

 ngOnInit() {
    window.addEventListener('load', async () => {
      if (window.ethereum) {
        await window.ethereum.enable();
        const provider = new providers.Web3Provider(window.ethereum);
        const signer = provider.getSigner();

        const paymentProcessor = new Contract(
          pp_address,
          PaymentProcessor.abi,
          signer
        );
        this.contracts.push(paymentProcessor)

        const dai = new Contract(
          dai_address,
          Dai.abi,
          signer
        );
        this.contracts.push(dai)
      }
    });
  }
We need a service to talk to backend. Go to app.module.ts and add HttpClientModule like this:
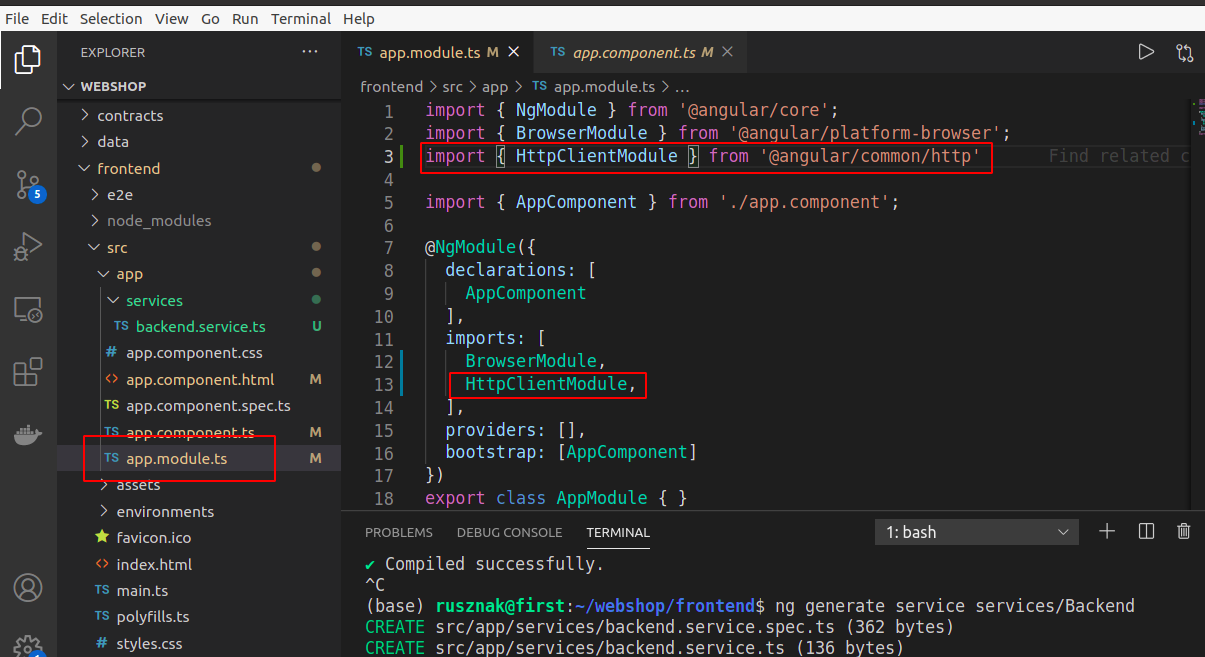
Then generate a service with the following command:
ng generate service services/Backend
its content should be as follows:
import { Injectable } from '@angular/core';
import { HttpClient } from '@angular/common/http';
import { Observable } from 'rxjs';

export interface PaymentIdConfig {
  paymentId: string;
}
export interface DownloadUrlConfig {
  url: string;
}
@Injectable({
  providedIn: 'root'
})
export class BackendService {
  constructor(private http_client: HttpClient) { }

  url: string = "http://localhost:4000/api/";

  getPaymentId(id: string): Observable<PaymentIdConfig> {
    const requestUrl = this.url + "getPaymentId/" + id;
    console.log(requestUrl);
    return this.http_client.get<PaymentIdConfig>(requestUrl);
  }

  getDownloadbleUrl(paymentId: string): Observable<DownloadUrlConfig> {
    const requestUrl = this.url + "getUrl/" + paymentId;
    console.log(requestUrl);
    return this.http_client.get<DownloadUrlConfig>(requestUrl);
  }
}
As you can see BackendService class has two simple functions which correspond to the endpoints in server.js. Both take a string as parameter and use it to build the proper Url and call the corresponding endpoints and return Observables.
If we want to call the service we need to inject it first. Here is the constructor of app.component.ts:
constructor(private backendService: BackendService) { }
We also need some kind of structure to store the id and the price of the purchasable items. In real life it should come from another DB call but for simplicity's sake I hard coded it in the app.component.ts file:
const ITEMS = [
  {
    id: 1,
    price: ethers.utils.parseEther('1')
  },
  {
    id: 2,
    price: ethers.utils.parseEther('3')
  },
]
Never mind that we pay by DAI but use "parseEther". It just gives the necessary zeroes after the value which are the same when using DAI or ether.
Now add the buy function which calls the service to app.component.ts:
  downloadUrl = 'Choose a product to download';
  async buy(n: number) {
    // first call to service to create 'paid:false' entry in DB
    this.backendService.getPaymentId(ITEMS[n].id.toString())
          .subscribe(async res => {

      const [paymentProcessor, dai] = this.contracts;
      //the buyer needs to approve that the contract spends his/her money
      const tx1 = await dai.approve(paymentProcessor.address, ITEMS[n].price);
      await tx1.wait();

      //buyer pays. Contract emits event. In the meantime backend inntercepts
      //event and sets 'paid:true' in DB
      const tx2 = await paymentProcessor.pay(ITEMS[n].price, res.paymentId);
      await tx2.wait();

      // we need some time to complete the transactions
      await new Promise(resolve => setTimeout(resolve, 5000));

      //second call to service. Returns the downloadable Url
      this.backendService.getDownloadableUrl(res.paymentId)
            .subscribe(r => {
        this.downloadUrl = r.url
      })
    });
  }
But what calls buy? The html-file. There are two buttons there for the users to click. These buttons are linked to the buy function like this (click)="buy(0). To finish the application just delete everything from app.component.html and paste the following there:
<div>
  <ul class='list-group'>
    <li class='list-group-item'>
      Buy Item 1 - <span class='font-weight-bold'>1 DAI</span>
      <button type='button' class='btn btn-primary float-right'
        (click)="buy(0)">
        Buy
      </button>
    </li>
    <li class='list-group-item'>
      Buy Item 2 - <span class='font-weight-bold'>3 DAI</span>
      <button type='button' class='btn btn-primary float-right'
        (click)="buy(1)">
        Buy
      </button>
    </li>
  </ul>
  <h1>{{ downloadUrl }}</h1>
</div>
To make it pretty, install bootstrap. npm install bootstrap
Then add bootstrap to angular.json like this:
 "styles": [
              "src/styles.css",
              "node_modules/bootstrap/dist/css/bootstrap.min.css"
            ],
That's it. Done. Congratulation.
You can start the whole thing like this:
- Make sure Hardhat Network is running. Open a terminal in the webshop directory and start by
npx hardhat node. - Open another terminal in webshop directory and deploy the contract:
npx hardhat run --network localhost scripts/deploy.js - Open a third terminal in webshop directory and start the database:
docker-compose up - Open a fourth terminal in backend directory and start the backend server.
node server.js - Open a fifth terminal and start the frontend server:
ng serve - Go http://localhost:4200/
- Import the second account (Account #1) to Metamask. It should have 10000 Test Ether to cover gas fees and 5000 Test DAI to spend. If you have imported and used it earlier then reset the transaction history otherwise you'll get Nonce to high error.


