
Homemade "Login by Face Recognition" Tutorial with fast.ai, Flask and React.


The Big Picture
In this step-by-step tutorial I show how to create a web application that recognizes your face. The model that does the heavy lifting (i.e. does the recognition, the AI stuff ) is a fast.ai model. I mean I trained my model following their guidance, in general I have been following their great course about Neural Networks since a while. Their 600-pages book covers a lot, it is full of practical guidance about training models. But as far as I know the model's integration with a web application is not included in the course nor in their book (with the exception of Voila which turns Jupyter Notebooks to web pages). Therefore in this post I want:
- to show how to create a web application that recognizes your face and lets you log in based on that.
- to show how to integrate a fast.ai model to a frontend framework. (React in this case)
The application's relevant code is available on Github. By relevant code I mean the exclusion of the trained model (which was trained to recognize my face).
Software versions
- OS: Ubuntu 20.04.2 LTS
- node: v14.15.4
- npm: 6.14.10
- Python: 3.8.3
- Flask: 1.1.2
- Werkzeug: 1.0.1
- fastai: 2.2.5
- fastcore: 1.3.19
- pytorch: 1.7.1
Creating Frontend
Create a new directory and open a terminal inside it and type npx create-react-app frontend inside it. This will create a new react app with the name of frontend. Enter it and launch the app by typing npm start.
We need to install react-webcam. Type npm install react-webcam. Check package.json to see the installed version when the installation is ready. Every dependency of our frontend ( i.e. only dependencies installed with npm or yarn but not with pip, conda, etc..!) will appear here so this is the place where you can check the version and the fact of the installation.
Inside the src folder create a new component and name it components/WebCamComp.js Its content should be the following:
import React, { useState, useRef, useCallback } from 'react';
import Webcam from 'react-webcam';

const WebcamCapture = (props) => {
    const webcamRef = useRef(null);
    const [imgSrc, setImgSrc] = useState(null);
    let counter = 0;

    function savePicture(imageSrc, counter) {
        let link = document.createElement("a");
        document.body.appendChild(link);
        link.href = imageSrc;
        counter++;
        link.download = "screenshot" + counter + ".jpg";
        link.click();
        document.body.removeChild(link);
        return counter;
    }

    const capture = useCallback(() => {
        const imageSrc = webcamRef.current.getScreenshot();
        setImgSrc(imageSrc);
        counter = savePicture(imageSrc, counter);
    }, [webcamRef, setImgSrc]);
    return (
        <>
            <Webcam
                audio={false}
                ref={webcamRef}
                screenshotFormat="image/jpeg"
            />
            <button onClick={capture}>Capture photo</button>
            {imgSrc && (
                <img
                    src={imgSrc}
                />
            )}
        </>
    );
};

export default WebcamCapture;
This component uses the earlier installed react-webcam and some React Hooks. It creates and saves snapshots of your web camera. To get it working we also need to modify App.js. Replace its content with the followings:
import WebCamComp from './components/WebCamComp'
function App() {
  return (
    <div className="App">
      <WebCamComp />
    </div>
  );
}
export default App;
We can now launch the application by typing npm start.
Go to localhost:3000. On the left side of the screen you should see the webcam with a Capture photo button. By clicking on this button you create and save an image which displays what was on the webcam at the moment of the click. Go ahead and save a good 100 pictures of yourself. No kidding, we really need some pictures some pictures to train the model. Each should be a bit different from the others; turn left, right, tilt your head, close your eyes, make funny faces, etc...
Creating Backend
At the same level where the frontend folder is located create a new folder and name it backend.
Enter it and create a Virtual Environment by typing python3 -m venv venv.
Then activate it: . venv/bin/activate.
Install flask and python-dotenv : pip install flask python-dotenv.
In the backend directory create two files backend.py and .flaskenv
The content of backend.py should be (at least for now, we'll modify it later):
from flask import Flask, request, make_response

app = Flask(__name__)

@app.route('/picture', methods=['POST'])
def call_predict():

    req = request.get_json()
    imagestr = req.get('image')
    imagestr = imagestr.replace('data:image/jpeg;base64', '')

    print(imagestr)

    res = make_response({"message": "OK"}, 200)

    return res
The content of .flaskenv should be:
FLASK_APP=backend.py
FLASK_ENV=development
The command to start our backend server is flask run. It needs to be executed from the backend folder. Type flask run and the result should be something like this:
 * Serving Flask app "backend.py" (lazy loading)
 * Environment: development
 * Debug mode: on
 * Running on http://127.0.0.1:5000/ (Press CTRL+C to quit)
 * Restarting with stat
 * Debugger is active!
 * Debugger PIN: 311-370-368
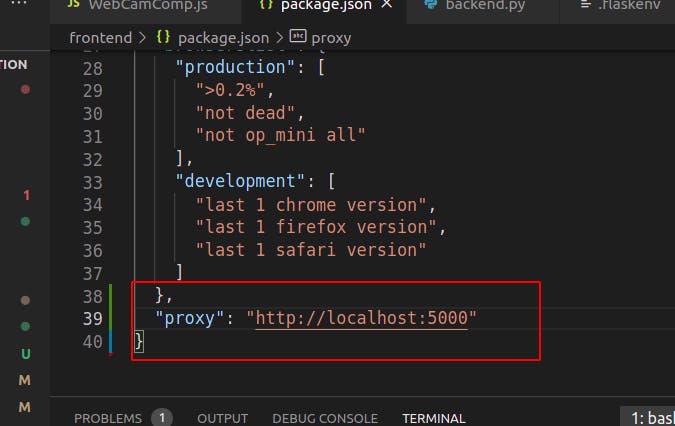
Bacause the backend runs on port:5000 we need a proxy to make things more convenient. Go to frontend/package.json and add the following line to the very end:
"proxy": "http//localhost:5000"
It should look like this:
To call our backend we need to modify WebCamComp.js. Let's add a function that actually calls our backend.
import React, { useState, useRef, useCallback } from 'react';
import Webcam from 'react-webcam';

const WebcamCapture = (props) => {
    const webcamRef = useRef(null);
    const [imgSrc, setImgSrc] = useState(null);
    let counter = 0;

    function callBackend(imageSrc, props) {
        let entry = {
            image: imageSrc
        };
        fetch(`${window.origin}/picture`, {
            method: "POST",
            body: JSON.stringify(entry),
            cache: "no-cache",
            headers: new Headers({
                "content-type": "application/json"
            })
        }).then(response => {
            console.log(response);
            if (response.status === 200) {
                props.history.push('/ok');
            } else if (response.status === 403) {
                props.history.push('/not_ok');
            }
        });
    }
    function savePicture(imageSrc, counter) {
        let link = document.createElement("a");
        document.body.appendChild(link);
        link.href = imageSrc;
        counter++;
        link.download = "screenshot" + counter + ".jpg";
        link.click();
        document.body.removeChild(link);
        return counter;
    }
    const capture = useCallback(() => {
        const imageSrc = webcamRef.current.getScreenshot();
        setImgSrc(imageSrc);
        callBackend(imageSrc, props);
        counter = savePicture(imageSrc, counter);
    }, [webcamRef, setImgSrc]);
    return (
        <>
            <Webcam
                audio={false}
                ref={webcamRef}
                screenshotFormat="image/jpeg"
            />
            <button onClick={capture}>Capture photo</button>
            {imgSrc && (
                <img
                    src={imgSrc}
                />
            )}
        </>
    );
};
export default WebcamCapture;
Now you can restart the application and click Capture photo. The image will be converted to base64 String and this string will be printed to backend's terminal.

This way we can make sure that the connection between frontend and backend is working. Clicking the button will also break the (frontend) application, but no worries, it's just temporary.
Integrating fast.ai
Creating the Model
I am not going to write long about creating the model because Jeremy and Sylvain have done it much better than I ever could. I decided to use google's colab. Below is my notebook:
!pip install -Uqq fastbook
import fastbook
fastbook.setup_book()
from fastbook import *
from fastai.vision.widgets import *
After the necessary imports I created two folders named me and not_me and filled them with images shot with this application.
types = 'me','not_me'
path = Path('people')
if not path.exists():
    path.mkdir()
I checked the quality of the uploaded images:
fns = get_image_files(path)
failed = verify_images(fns)
and created datablock and dataloaders:
people = DataBlock(
blocks=(ImageBlock, CategoryBlock),
get_items=get_image_files,
splitter=RandomSplitter(valid_pct=0.2, seed=42),
get_y=parent_label,
item_tfms=Resize(128))

dls =people.dataloaders(path)
I did some data augmentation:
people = people.new(
    item_tfms=RandomResizedCrop(224, min_scale=0.5),
    batch_tfms=aug_transforms())
dls = people.dataloaders(path)
and I settled down the usage of Resnet50 and fine tuning for 5 epochs. (From around the sixth-seventh epoch the results started to deteriorate)
learn = cnn_learner(dls, resnet50, metrics=error_rate)
learn.fine_tune(5)
The results are below:
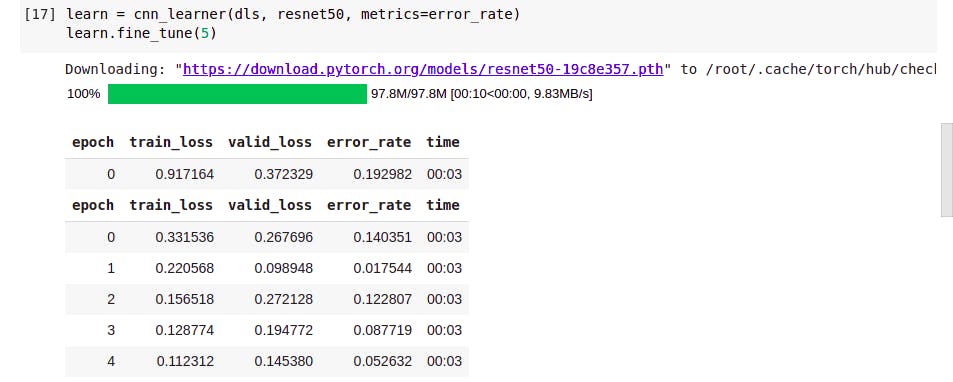
The confusion matrix looked acceptable so I exported and downloaded the model.
Importing the model
I put the downloaded model into the backend folder.
We need to install fastai, type: pip install fastai.
ATTENTION fast.ai comes with PyTorch and PyTorch needs a lot of free RAM and if your Virtual Environment does not have enough, it will present a very frustrating error:
Using cached https://files.pythonhosted.org/packages/31/a4/c10f07959fd58ffd066518e3f163f55d40bc033191184a8903e660d88c03/pandas-1.2.2-cp38-cp38-manylinux1_x86_64.whl
Collecting torch<1.8,>=1.7.0 (from fastai)
Killed
If everything is OK, change the content of backend.py to the following:
from flask import Flask, request, make_response
import base64
from fastai import *
from fastai.vision.all import *

app = Flask(__name__)
path = Path()
learn_inf = load_learner(path/'export.pkl')


@app.route('/picture', methods=['POST'])
def call_predict():
    req = request.get_json()
    imagestr = req.get('image')
    imagestr = imagestr.replace('data:image/jpeg;base64', '')
    image = base64.b64decode(str(imagestr))
    pili_img = PILImage.create(io.BytesIO(image))

    pred, pred_idx, probs = learn_inf.predict(pili_img)
    print("pred")
    print(pred)
    print(probs)
    if pred == "me":
        res = make_response({"message": "OK"}, 200)
    else:
        res = make_response({"message": "Unrecognized"}, 403)
    return res
Our updated backend now imports the exported model when the server starts. When call_predict() gets called by the frontend, it converts a base64 string to an image and forwards this image to the model instance to make a prediction. We log the prediction and create and return a response based on it.
Finishing touches
Let's create two components, OkComponent.js which will be displayed if the model recognized me, and NotOkComponent.js which will be displayed otherwise. Both should be located inside frontend's components folder. Their content is basic:
import React from 'react'
const OkComponent = () => {
    return (
        <div>
            <h1>Recognized. Welcome here</h1>
        </div>
    )
}
export default OkComponent
import React from 'react'
const NotOkComponent = () => {
    return (
        <div>
            <h1>Sorry, you are not being recognized</h1>
        </div>
    )
}
export default NotOkComponent
In order to use them we need Routing. Stop the frontend server and type:
npm install react-router-dom.
Then replace App.js with the code below which utilizes Routing:
import { BrowserRouter, Route, Switch } from 'react-router-dom';
import WebCamComp from './components/WebCamComp';
import OkComponent from './components/OkComponent';
import NotOkComponent from './components/NotOkComponent';
function App() {
  return (
    <BrowserRouter>
      <div className="App">
        <Switch>
          <Route path="/" exact component={WebCamComp}></Route>
          <Route path="/ok" component={OkComponent}></Route>
          <Route path="/not_ok" component={NotOkComponent}></Route>
        </Switch>
      </div>
    </BrowserRouter>
  );
}
export default App;
The routing works only because of following part of WebcamCapture:
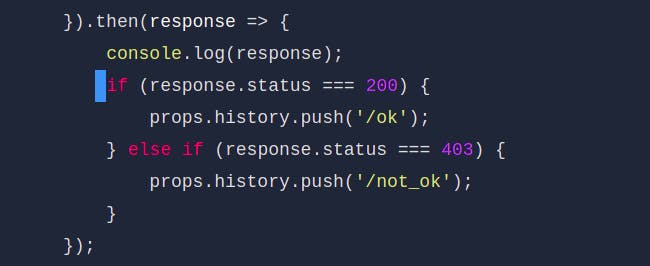
That's it. Done. Restart the application, and you'll be recognized and forwarded to OkComponent assuming you trained your model well. Congrats, you made it till the end and now you know how to integrate fast.ai with a web application.