Unhackable CRUD Application Tutorial. Ditch the complete legacy IT Stack with Dfinity's Internet Computer

I am a Professional Software Developer. On the backend side I work with Java on the frontend side I use React or Angular. Recently I made my baby steps in the fields of Machine Learning (mainly fast.ai) and Blockchain (Ethereum, Chainlink, Internet Computer(Dfinity)). This is where my professional interest lies.
The Big Picture
In this step-by-step tutorial I create a simple CRUD Application, which is a very simple Customer Management System. I strongly believe that the underlying technology is truly remarkable. Dfinity's Internet Computer is the next step of blockchain evolution. This Switzerland-based non-profit organization promises nothing less than the complete redesign of the entire internet and the way how developers write and deploy software. It's worth repeating: they promise us a blockchain-based public network that can be used as a
complete replacement for today’s legacy IT stack
including Big Tech’s cloud services, and legacy infrastructure software such as file systems, web servers, middleware, and databases. No more databases. No more firewalls. The Internet Computer’s serverless architecture allows the internet to natively host software and services, eliminating — claims Dfinity — the need for proprietary cloud services. Therefore no more third-party cloud providers like AWS or Google Cloud. No more virtual monopolies like Facebook, LinkedIn, Instagram and WhatsApp. And no more platform risk.
But, one might object, blockchain is so slow and expensive... However Dfinity claims that Internet Computer is highly scalable and runs at web speed, with some functions taking only milliseconds. It also has unbounded capacity. Visitors of the page don't need to install Metamask or any other wallet. They can access the application the same way as any other website (i.e. there is no gas fee for them). And because blockchains are unique in their ability to prevent tampering and provide open verification of blocks added to the chain, Internet Computer is tamper-proof and unhackable by design. If a block is modified, its hash changes and all subsequent blocks no longer point to the correct hash, invalidating them. A nefarious person would need to go through all of the following blocks and re-calculate their hashes to modify the blockchain. But even then the changes would differ from the consensus of the majority of validating nodes, therefore they would be rejected.
As Dominic Williams summarizes: The Internet Computer guarantees that hosted code can only be run in authorized ways, that only the expected code runs against the correct and expected data, and the math used to form the platform leaves hackers with no means to subvert those guarantees...because even the most skilled of hackers cannot make 2+2=5
All this looks too good to be true? We shall see. I definitely root for them.
This tutorial's code is available on Github. Special thanks to Enzo Haussecker whose repository was quite helpful when I did my baby steps on the rough terrain of motoko.
Software versions
- OS: Ubuntu 20.04.2 LTS
- node: v14.15.4
- npm: 6.14.10
- dfx: 0.6.26 !!! Make sure that you are using this version for this tutorial !!!
Installing dfx
dfx is the command line tool to interact with Internet Computer.
Create a variable like below. Use the same version because anything beyond 0.7.0-beta requires different approach!
export DFX_VERSION=0.6.26
Run the following script to download dfx.
sh -ci "$(curl -fsSL https://sdk.dfinity.org/install.sh)"
if it is done, check the installed version:
dfx --version
It should be 0.6.26
Creating Canisters
Canister is a software unit that contains both code and state. Under the hood of a canister, there is smart contract logic in the form of WebAssembly byte code. The reason canisters are called “canisters” rather than “smart contracts” is that they are in fact bundles of code and state. State is persisted naturally by the system therefore no need of databases and you just declare a data structure as you need it. Internet Computer implements orthogonal persistence —an old idea where a program has the illusion of running “forever” and its memory staying alive (at least until it is explicitly taken down). This means that developers do not have to worry about explicitly saving their data or bother with files or an external database: whatever values or data structures are stored in program variables will still be there when the next message arrives, even if that is months later.
Let's create a new project. Open a terminal and type:
dfx new crud
Enter the freshly created crud directory (our root directory) and start the network there:
dfx start --clean
Open another terminal also in the crud directory and create the canisters:
dfx canister create --all
This creates two canisters, one with the name of crud and another with the name of crud_assets.
Build the canisters:
dfx build
and install them:
dfx canister install --all
The generated canister id-s are located in .dfx/local/canister_ids.json.
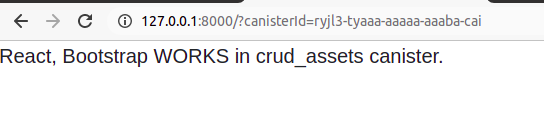
Copy the canister id for crud_assets. For me it is ryjl3-tyaaa-aaaaa-aaaba-cai. You can access the application using the assets' canister id in any browser like this:
http://127.0.0.1:8000/?canisterId=ryjl3-tyaaa-aaaaa-aaaba-cai
The application's generated code greets you with a popup. Try it out.
Using React
Let's reactify the frontend. Append the list of devDependencies with css-loader and add dependencies to package.json like below:
 "devDependencies": {
    ...
    "css-loader": "^5.2.4"
 },
"dependencies": {
    "bootstrap": "^4.6.0",
    "react": "^17.0.2",
    "react-bootstrap": "^1.5.2",
    "react-dom": "^17.0.2",
    "react-router-dom": "^5.2.0",
    "style-loader": "^2.0.0",
    "ts-loader": "^8.1.0",
    "typescript": "^4.2.3"
  }
Run npm install to install everything we need. Create a tsconfig.json file in the root directory with the following content:
{
    "compilerOptions": {
        "target": "es2018", /* Specify ECMAScript target version: 'ES3' (default), 'ES5', 'ES2015', 'ES2016', 'ES2017', 'ES2018', 'ES2019' or 'ESNEXT'. */
        "module": "commonjs", /* Specify module code generation: 'none', 'commonjs', 'amd', 'system', 'umd', 'es2015', or 'ESNext'. */
        "lib": [
            "ES2018",
            "DOM"
        ], /* Specify library files to be included in the compilation. */
        "allowJs": true, /* Allow javascript files to be compiled. */
        "jsx": "react", /* Specify JSX code generation: 'preserve', 'react-native', or 'react'. */
        "esModuleInterop": true
    },
    "include": [
        "src/**/*"
    ],
}
Add the module to the end of webpack.config.js file, above plugins: [],:
    module: {
      rules: [
        { test: /\.(js|ts)x?$/, loader: "ts-loader" },
        {
          test: /\.css$/,
          loader: 'style-loader!css-loader'
        },
        {
          test: /\.(png|jpg|gif|svg|eot|ttf|woff|woff2)$/,
          loader: 'url-loader',
          options: {
            limit: 10000
          }
        }
      ]
    },
Change index.js to index.jsx in dfx.json like this:
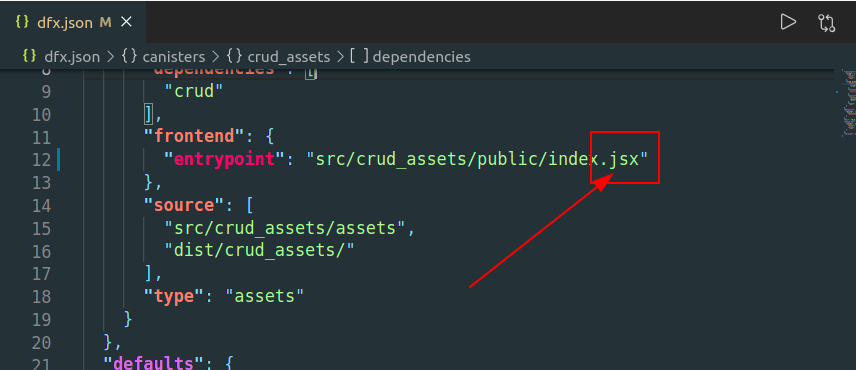
Rename the actual file itself to src/crud_assets/public/index.jsx. Replace the content of index.jsx
with the following:
import React from 'react';
import ReactDOM from 'react-dom';
import App from './App';
import 'bootstrap/dist/css/bootstrap.min.css';

ReactDOM.render(
  <React.StrictMode>
    <App />
  </React.StrictMode>,
  document.getElementById('app')
);
In the same directory where index.jsx is, create another file with the name of App.js. The content should be the following:
import React from 'react';
const App = () => {
    return (
        <div>
            React, Bootstrap WORKS in crud_assets canister.
        </div>
    );
}
export default App
Rebuild the application with dfx build. Reinstall the application with the --mode reinstall flag:
dfx canister install --all --mode reinstall
The result should be like this in your browser:
Adding Create and Read functionality
Backend
First, let's modify the crud canister in src/crud/main.mo. This is our backend and our database (i.e. the place where we persist data in the form of data structures like Arrays or Tries). The language here is motoko, a semicolon-and-curly-braces language, which was tailor-made for Internet Computer. The language's creators say Motoko has been designed to be intuitive to those familiar with Javascript and other popular languages, but offers modern features such as sound structural types, generics, variant types, and checked pattern matching. I for one believe them on this, I know javascript and motoko is somewhat intuitive to me. However, this is a very new language (currently even Github mislabels it as Modelica) so it keeps evolving with each release of Dfinity Canister SDK.
Remove everything from src/crud/main.mo and paste the following content:
import Array "mo:base/Array";
import Nat "mo:base/Nat";
import Option "mo:base/Option";
import Trie "mo:base/Trie";

actor Assistant {
    public type Id = Word32;
    private stable var next : Id = 0;

    // the data structure to store the customers.
    private stable var customers : Trie.Trie<Id, Customer> = Trie.empty();

   type Customer = {
        name: Text;
        address: Text;
        email:Text;
    };

    type CustomerWithId = {
        id: Id;
        name: Text;
        address: Text;
        email:Text;
    };

    // adds new customer to
    public func addCustomer (newCustomer: Customer) : async Id {
        let id = next;
        next +%= 1;
        customers := Trie.replace(
            customers,
            key(id),
            eq,
            ?newCustomer,
        ).0;

        return id;
    };

    public query func findAll () : async [CustomerWithId]  {
        let customersAsArray = Trie.toArray<Id, Customer, CustomerWithId>(customers, transform);
        return customersAsArray;
    };

    private func transform(id:Id, cust:Customer): CustomerWithId{
        let newCustomerWithId : CustomerWithId = {
            id = id;
            name = cust.name;
            address =  cust.address;
            email = cust.email;
        };
        return newCustomerWithId;
    };

    private func eq(x : Id, y : Id) : Bool {
        return x == y;
    };

    private func key(x : Id) : Trie.Key<Id> {
        return { hash = x; key = x };
    };
};
We create an actor to contain our logic. On the surface an actor can resemble a class. But it is definitely not a class rather " it is like an object (and in Motoko, even looks like one),
in that it encapsulates private state along with a set of methods to process
messages that can be sent to it. But all message sends are asynchronous.
Consequently, unlike conventional methods in OO, actor methods do not have results.
Moreover, all messages are received sequentially by an actor—that is,
it has an implicit message queue and methods execute atomically,
even when messages are sent concurrently.
Actors are a great model for concurrent programming because they automatically prevent race conditions (thanks to atomicity and encapsulated state) and deadlocks (because execution never blocks), and hence rule out many concurrency bugs." (Andreas Rossberg)
Our actor has a public function addCustomer. It is public, therefore we can call it from the frontend canister. This function adds (i.e. saves) an entry to the database the underlying data structure which is a Trie<Id, Customer>.
The other public function findAll() queries our database persisting data structure. Note it is marked as query because queries return results faster than update calls. (But queries don’t go through consensus - that means that they are inherently less secure! But in this case it doesn't matter.) Therefore, explicitly marking a function as a query is an effective strategy for improving application performance.
However there is one issue here; the best data structure to store the customers and to lookup one individual customer by id is the Trie<Id, Customer> where the key is an id and the value is the Customer. Unfortunately the use of Trie proved difficult when I wanted to display all the customers on the frontend. That's why I decided to convert (i.e. flatten) the Trie<Id, Customer> to an array of CustomerWithId. But I am new to motoko, and there is probably a better way to do it. Leave me a comment if you know a better solution.
Frontend
Create two files with the following names:
- components/Create.js
- components/Display.js
Create.js needs to have the following content:
import React, { useState, useEffect } from 'react';
import crud from 'ic:canisters/crud';

const Create = (props) => {

    const [pageTitle, setPageTitle] = useState('');
    const [name, setName] = useState('');
    const [address, setAddress] = useState('');
    const [email, setEmail] = useState('');
    const id = props.match.params.id;

    const changeNameHandler = (event) => {
        setName(event.target.value);
    }

    const changeAddressHandler = (event) => {
        setAddress(event.target.value);
    }

    const changeEmailHandler = (event) => {
        setEmail(event.target.value);
    }

    const saveOrUpdate = (event) => {
        event.preventDefault();
        if (!name || !address || !email) {
            alert("Fill everything");
            return;
        }
        let customer = {
            name: name,
            address: address,
            email: email,
        };
        crud.addCustomer(customer).then((result) => {
            props.history.push('/customers');
        });
    }

    return (
        <div>
            <h2 className="text-center">{pageTitle}</h2>

            < input name="name" placeholder=" Customers Name"
                value={name} onChange={changeNameHandler} />
            <input name="address" placeholder="Address"
                value={address} onChange={changeAddressHandler} />
            <input name="email" placeholder="Email"
                value={email} onChange={changeEmailHandler} />
            <button className="btn btn-success" onClick={saveOrUpdate}>Save</button>
        </div>
    )
}
export default Create
There are three input fields here and a button. The button calls the saveorUpdate() function. The function creates a Customer object and calls backend and passes the Customer as argument.
Display.js needs the following content:
import React, { useState, useEffect } from 'react';
import crud from 'ic:canisters/crud';

const Display = (props) => {

    const [customers, setCustomers] = useState([]);
    useEffect(() => {
        loadCustomers();
    }, []);

    const loadCustomers = () => {
        crud.findAll().then((result) => {
            if (result) {
                setCustomers(result);
            }
        });
    }

    const addCustomer = (() => {
        props.history.push('/add/-1');
    });

    const editCustomer = ((id) => {
        console.log(id);
    });

    const deleteCustomer = ((id) => {
        console.log(id);
    });

    return (
        <div className="row">
            <div>
                <button className="btn btn-primary" onClick={addCustomer}>
                    Add New Customer
                </button>
            </div>
            <h2 className="text-center">List of our Customers:</h2>

            <table className="table table-striped table-bordered">
                <thead>
                    <tr>
                        <th>Name</th>
                        <th>Address</th>
                        <th>email</th>
                        <th>Actions</th>
                    </tr>
                </thead>
                {<tbody>
                    {Object.entries(customers).map(
                        cust =>
                            <tr key={cust[1].id}>
                                <td>
                                    < input name="name" value={cust[1].name} type="text"
                                    />
                                </td>
                                <td>
                                    < input name="address" value={cust[1].address} type="text"
                                    />
                                </td>
                                <td>
                                    < input name="email" value={cust[1].email} type="text"
                                    />
                                </td>
                                <td>
                                    <button onClick={() => editCustomer(cust[1].id)} className="btn btn-info">Update</button>
                                    <button onClick={() => deleteCustomer(cust[1].id)} className="btn btn-danger">Delete</button>
                                </td>
                            </tr>
                    )}
                </tbody>
                }
            </table>
        </div>
    )
}
export default Display
The hook useEffect with an empty array runs only when the component is loaded. It fetches the entries from backend. The entries are displayed as a table. There are two other functions editCustomer and deleteCustomer here, which we are going to implement later.
To take advantage of routing, replace the old content of App.js with this:
import React from 'react';

import { BrowserRouter, Route, Switch } from 'react-router-dom';
import Create from './components/Create';
import Display from './components/Display';

const App = () => {
    return (
        <div>
            <BrowserRouter>
                <div className="container">
                    <Switch>
                        <Route path="/" exact component={Display}></Route>
                        <Route path="/customers" component={Display}></Route>
                        <Route path="/add/:id" component={Create}></Route>
                    </Switch>
                </div>
            </BrowserRouter>
        </div>
    );
}
export default App
Build and reinstall the application. The add function should be ready to use.
Adding Update and Delete functionality
Backend
Add two more functions to the motoko file:
    public query func findCustomerById(id : Id) : async ?Customer {
        let result = Trie.find(customers, key(id), eq);
        return result;
    };

    //delete Customer if updatedCustomer is null. Otherwise update.
    public func updateOrDelete(id : Id, updatedCustomer: ?Customer) : async Bool {
        let result = Trie.find(customers, key(id), eq);
        let exists = Option.isSome(result);
        if (exists) {
        customers := Trie.replace(
            customers,
            key(id),
            eq,
            updatedCustomer,
        ).0;
        };
        return exists;
    };
To update an existing Customer we fetch the old values associated with it. That's why we have findCustomerById(id : Id). We provide an id and the function returns a Customer. On the frontend we use these old values to fill the same input fields where we created a new entry. The function updateOrDelete(...) speaks for itself. If the second argument is a valid Customer, we update it. If it is null, we delete the Customer which belongs to the given id.
Frontend
Create another file with the name of components/helper.js. Its content should be the following:
export const fromOptional = (optional) => {
    return optional.length > 0 ? optional[0] : null;
}

export const toOptional = (object) => {
    return object ? [object] : [];
}
Both Display.js and Create.js needs to import the newly created file:
import { fromOptional, toOptional } from './helper';
Create.js needs an useEffect:
    useEffect(() => {
        if (id == -1) {
            setPageTitle("Add new Customer");
            return;
        }
        setPageTitle("Edit existing Customer");
        crud.findCustomerById(parseInt(id)).then((result) => {
            let updatableCustomer = fromOptional(result);
            setName(updatableCustomer.name);
            setAddress(updatableCustomer.address);
            setEmail(updatableCustomer.email);
        });
    }, []);
The value of id is passed in the props:
const Create = (props) => {
    const id = props.match.params.id;
...
The id can be a positive number or -1. If the id is -1 we are just about to create a new Customer entry therefore there is nothing to fetch from backend. However if id is a positive number (i.e. a real id of an existing Customer) we need to call the backend for the old values to pre-fill the input fields. This is also the place to set the title of the page. For this we need to add the followings to the top of the div:
 return (
        <div>
            <h2 className="text-center">{pageTitle}</h2>
To accommodate our changes the saveOrUpdate function needs to be updated to this:
    const saveOrUpdate = (event) => {
        event.preventDefault();
        if (!name || !address || !email) {
            alert("Fill everything");
            return;
        }
        let customer = {
            name: name,
            address: address,
            email: email,
        };
        if (id < 0) {
            crud.addCustomer(customer).then((result) => {
                props.history.push('/customers');
            });
        } else {
            crud.updateOrDelete(parseInt(id), toOptional(customer)).then((r) => {
                props.history.push('/customers');
            });
        }
    }
Again, everything depends on the id. If the id is <0 (i.e. -1) we call the function which creates a new entry. Otherwise we call the update function.
Whether the id is -1 or not is decided in Display.js. If we edit an existing one we just forward its id like this. Add the following Snippet to Display.js:
   const editCustomer = ((id) => {
        props.history.push(`/add/${id}`);
    });
We also need to implement the delete functionality. Add the following snippet:
  const deleteCustomer = ((id) => {
        crud.updateOrDelete(parseInt(id), toOptional(null)).then((result) => {
            if (result) {
                loadCustomers();
            }
        });
    });
Build and reinstall as usual. The application should run like this:
That's it. Congratulation. Now you also made your baby steps in the fascinating world of tomorrow's Internet.


