CRUD Application Tutorial using MySQL, Spring Boot, React Hooks and Docker - PART 1


The Big Picture
In this step-by-step tutorial we are going to create a fullstack CRUD Application using MySQL, Spring Boot, the modern, function-based React and Docker.
My goal is to write an easy-to-follow, step-by-step and detailed guide that demonstrates the use of the above mentioned technologies by creating a basic Customer Management System.
There's quite a bit of coding and configuration ahead of us that's why I will confine myself to the essentials which will be explained through code examples and screenshots. Let me tell you at the very beginning that we are not going to create therefore a pretty application; no fancy CSS styling or Footer, Header or anything similar. (The only exception is the minimal use of Bootstrap)
To keep it in manageable size, I break it in two parts. Here in the first part we create the database, the backend, and fetch the content of the database and display it using a React component. In the second part we continue by adding additional functionality: create, update and delete and dockerize the backend and the frontend.
The application's full code is available on Github
Software versions:
- OS: Ubuntu 20.04.2 LTS
- Java: openjdk 11.0.10
- node: v14.15.4
- npm: 6.14.10
- Docker: 20.10.3
- docker-compose 1.28.2
- MySQL is not installed on my Computer, it runs only inside a Docker Container.
Creating the Database
Creating the database is easy. We are not going to install MySQL nor any other database. Once you installed Docker , create a file and name it docker-compose-file-example.yaml Actually you can name it as you wish, but the yaml extension is not negotiable.
The content the file should be the following:
services:
  adminer:
    image: adminer
    restart: always
    ports:
      - 8888:8080
  db:
    image: mysql:latest
    restart: always
    environment:
      MYSQL_ROOT_PASSWORD: 'example' # TODO: Change this
    volumes:
     - "./data:/var/lib/mysql:rw"
This script will download two images from dockerhub (adminer, mysql) and will create two corresponding containers. In case you don't know adminer, it's just a database-management tool and we use it only because it's simple and convenient. Normally it runs on port 8080 but we will need localhost:8080 for other purposes so we map adminer to port 8888.
Whenever we restart a database container its content will be lost unless we use volumes. Using
volumes ensures the survival of the db's content between restarts. In this case the ./data part is arbitrary, you can name it as you wish but the /var/lib/mysql:rw needs to be exactly as it is, at least in case of a MySQL database.
Let's start the containers:
docker-compose -f docker-compose-file-example.yaml up
Let's check if everything is OK. Type docker ps. This should display the running containers as follows:
(base) rusznak@first:~/Desktop/CRUD$ docker ps
CONTAINER ID   IMAGE          COMMAND                  CREATED          STATUS          PORTS                    NAMES
e5d6941a97db   adminer        "entrypoint.sh docke…"   23 minutes ago   Up 23 minutes   0.0.0.0:8888->8080/tcp   crud_adminer_1
6abf8ae25d62   mysql:latest   "docker-entrypoint.s…"   23 minutes ago   Up 23 minutes   3306/tcp, 33060/tcp      crud_db_1
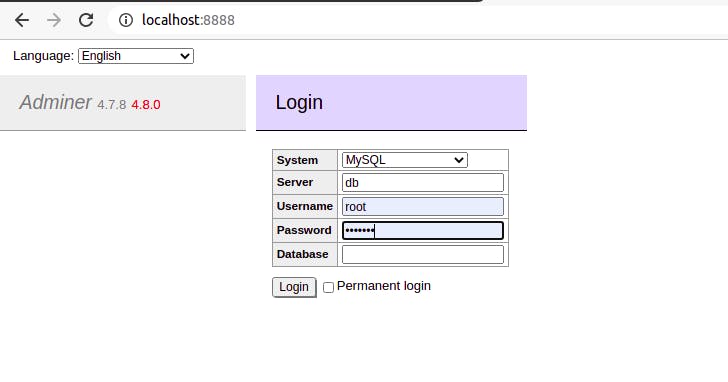
If everything is OK, hit localhost:8888 where you'll be greated by the adminer client.
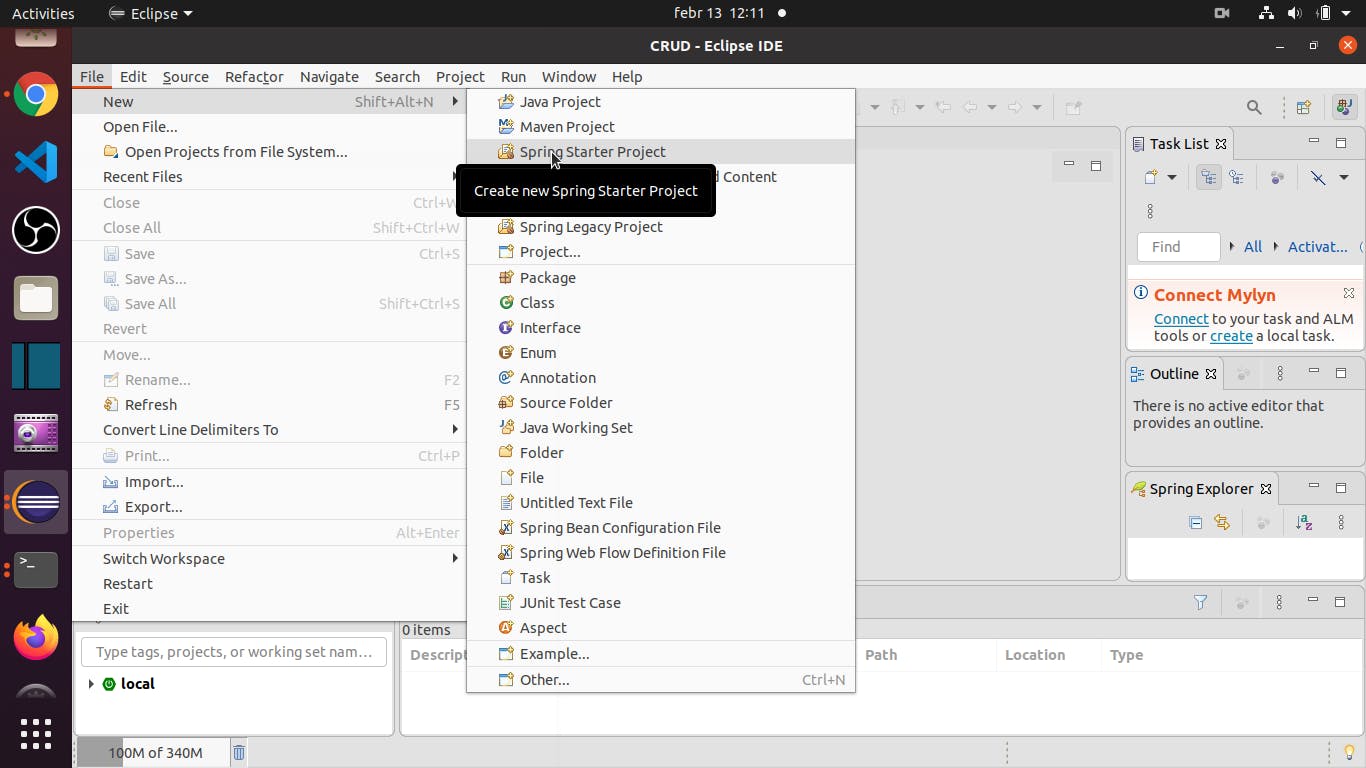
Creating Backend
Normally I use IntelliJ IDEA for Java development but Intellij IDEA Community Edition does not support Spring Boot. Although there are some workarounds but let's just resort to Eclipse. Attention: normal Eclipse not going to work! What we need here is Eclipse STS!
Create a new project:
Configure the project like this:
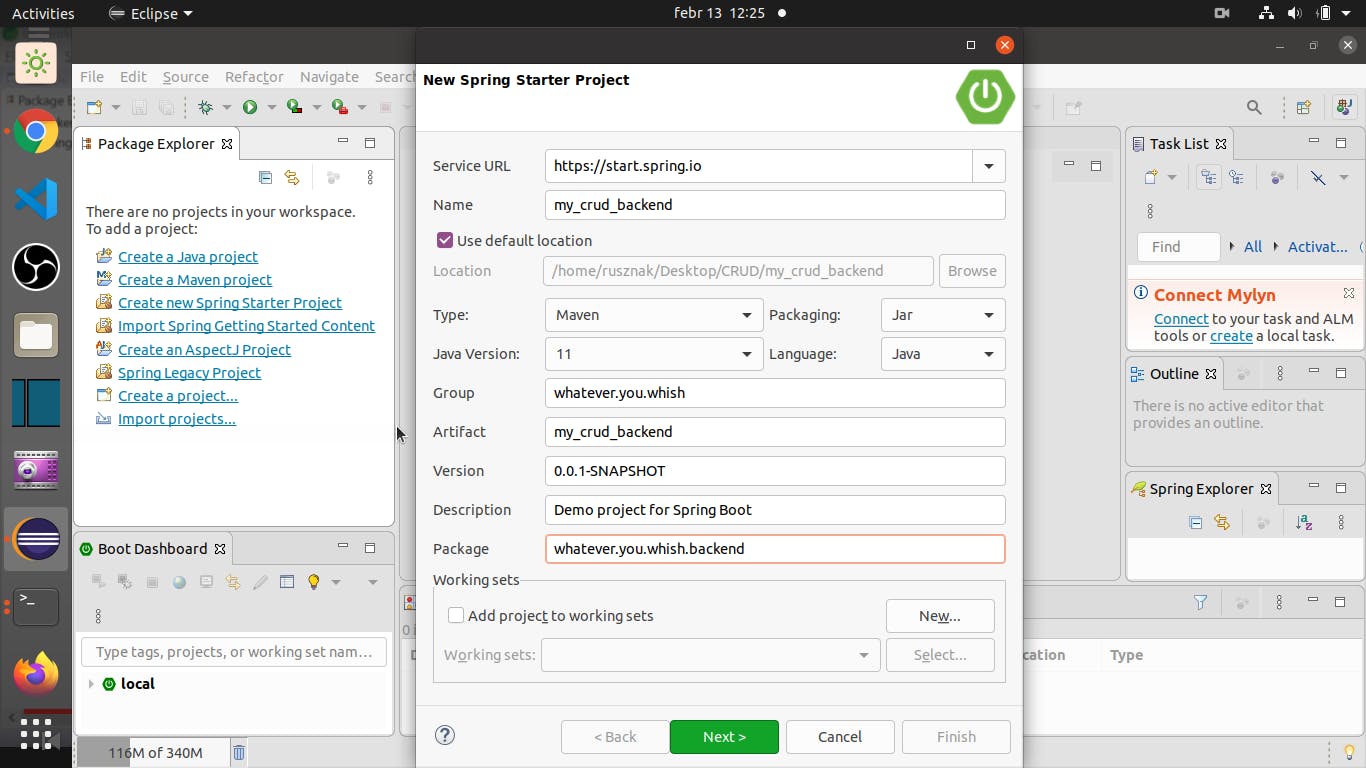
After hitting 'Next', add dependencies like this:
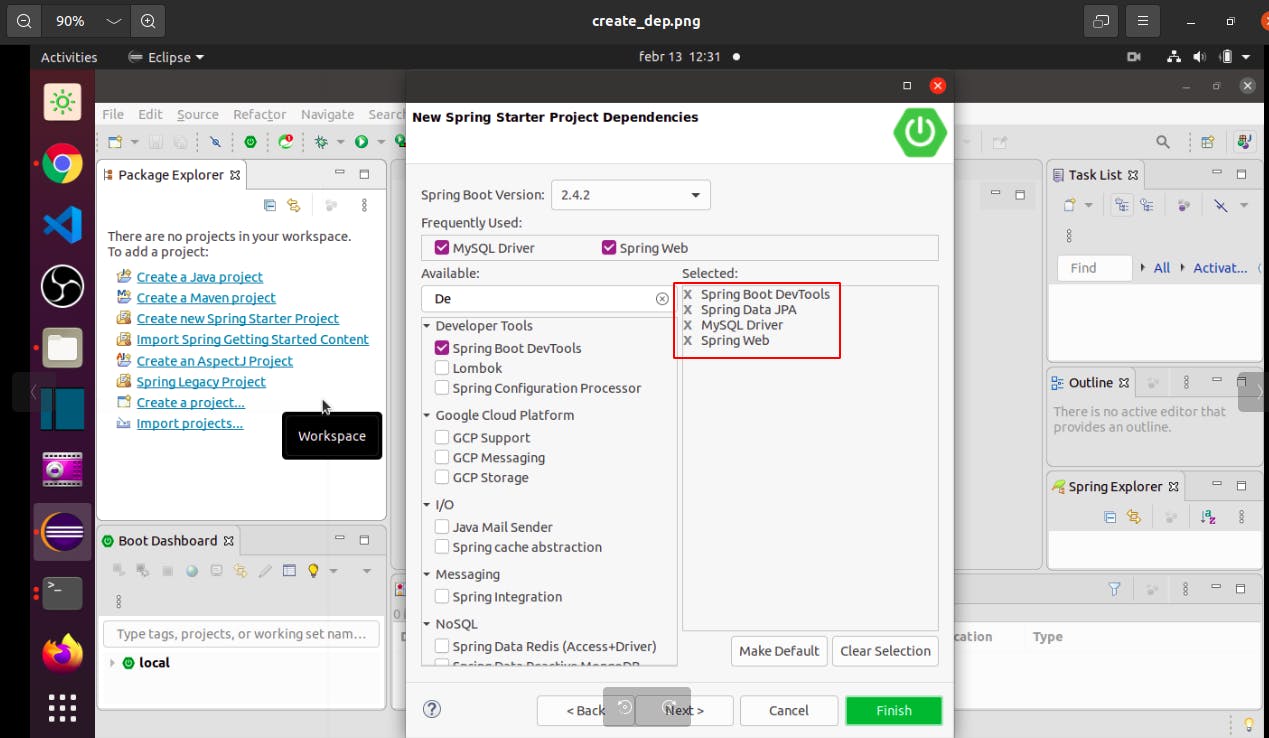
We have four dependencies:
- Spring Web
- MySQL Driver
- Spring Data JPA
- Spring Boot DevTools (only for the sake of convenience, this way we don't need to restart the server whenever we modify the code. Obviously works only before we 'dockerize' our project. After that we need to create a new image after modification of code.)
Below is the generated pom.xml:
<?xml version="1.0" encoding="UTF-8"?>
<project xmlns="http://maven.apache.org/POM/4.0.0" xmlns:xsi="http://www.w3.org/2001/XMLSchema-instance"
    xsi:schemaLocation="http://maven.apache.org/POM/4.0.0 https://maven.apache.org/xsd/maven-4.0.0.xsd">
    <modelVersion>4.0.0</modelVersion>
    <parent>
        <groupId>org.springframework.boot</groupId>
        <artifactId>spring-boot-starter-parent</artifactId>
        <version>2.4.2</version>
        <relativePath/> <!-- lookup parent from repository -->
    </parent>
    <groupId>whatever.you.wish</groupId>
    <artifactId>my_crud_backend</artifactId>
    <version>0.0.1-SNAPSHOT</version>
    <name>my_crud_backend</name>
    <description>Demo project for Spring Boot</description>
    <properties>
        <java.version>11</java.version>
    </properties>
    <dependencies>
        <dependency>
            <groupId>org.springframework.boot</groupId>
            <artifactId>spring-boot-starter-data-jpa</artifactId>
        </dependency>
        <dependency>
            <groupId>org.springframework.boot</groupId>
            <artifactId>spring-boot-starter-web</artifactId>
        </dependency>

        <dependency>
            <groupId>org.springframework.boot</groupId>
            <artifactId>spring-boot-devtools</artifactId>
            <scope>runtime</scope>
            <optional>true</optional>
        </dependency>
        <dependency>
            <groupId>mysql</groupId>
            <artifactId>mysql-connector-java</artifactId>
            <scope>runtime</scope>
        </dependency>
        <dependency>
            <groupId>org.springframework.boot</groupId>
            <artifactId>spring-boot-starter-test</artifactId>
            <scope>test</scope>
        </dependency>
    </dependencies>

    <build>
        <plugins>
            <plugin>
                <groupId>org.springframework.boot</groupId>
                <artifactId>spring-boot-maven-plugin</artifactId>
            </plugin>
        </plugins>
    </build>

</project>
Let's create a Customer entity class. A simple one. Annotated fields, getters-setters, constructors and the class marked as @Entity:
package whatever.you.wish.backend.model;

import javax.persistence.Column;
import javax.persistence.Entity;
import javax.persistence.GeneratedValue;
import javax.persistence.GenerationType;
import javax.persistence.Id;
import javax.persistence.Table;

@Entity
@Table(name= "customers")
public class Customer {

    @Id
    @GeneratedValue(strategy = GenerationType.IDENTITY)
    private long id;

    @Column(name = "name")
    private String name;

    @Column(name = "address")
    private String address;

    @Column(name = "email")
    private String email;

    public Customer() {}

    public Customer(String name, String address, String email) {
        super();
        this.name = name;
        this.address = address;
        this.email = email;
    }

    public long getId() {
        return id;
    }

    public void setId(long id) {
        this.id = id;
    }

    public String getName() {
        return name;
    }

    public void setName(String name) {
        this.name = name;
    }

    public String getAddress() {
        return address;
    }

    public void setAddress(String address) {
        this.address = address;
    }

    public String getEmail() {
        return email;
    }

    public void setEmail(String email) {
        this.email = email;
    }
}
We also need an interface for persistance. Don't forget to annotate it with @Repository:
package whatever.you.wish.backend.controller;


import org.springframework.data.jpa.repository.JpaRepository;
import org.springframework.stereotype.Repository;

import whatever.you.wish.backend.model.Customer;

@Repository
public interface CustomerRepository extends JpaRepository<Customer, Long>{
}
Furthermore, we need a Controller class for Backend. For the moment, let's keep it simple. Let's start only with fetching the data from the database and later we'll cover the rest (create, update, delete).
package whatever.you.wish.backend.controller;

import java.util.List;

import org.springframework.beans.factory.annotation.Autowired;
import org.springframework.web.bind.annotation.GetMapping;
import org.springframework.web.bind.annotation.RequestMapping;
import org.springframework.web.bind.annotation.RestController;

import whatever.you.wish.backend.model.Customer;

@RestController
@RequestMapping("/api/version_1/")
public class CustomerController {

    @Autowired
    private CustomerRepository repository;

    @GetMapping("/customers")
    public List<Customer> getAllCustomers() {
        return repository.findAll();
    }
}
Finally, go to src/main/resources/application.propeties file and add the following:
spring.datasource.url=jdbc:mysql://HERE_COMES_IP_ADDRESS:3306/customer_database?allowPublicKeyRetrieval=true&useSSL=false&createDatabaseIfNotExist=true

spring.datasource.username=root
spring.datasource.password=example

spring.jpa.database=mysql
spring.jpa.properties.hibernate.dialect=org.hibernate.dialect.MySQL5InnoDBDialect

spring.jpa.hibernate.ddl-auto=update
Replace HERE_COMES_IP_ADDRESS with the result of the following command: docker inspect crud_db_1 | grep 'IPAddress'
This time mine happened to be 172.26.0.3 so I need to use this value.
(base) rusznak@first:~/Desktop/CRUD$ docker inspect crud_db_1 | grep 'IPAddress'
            "SecondaryIPAddresses": null,
            "IPAddress": "",
                    "IPAddress": "172.26.0.3",
This IPAddress may or may not change after each restart, and we'll fix this issue in the docker-compose file. Because we configured createDatabaseIfNotExist=true in application.properties Spring Boot will generate our Database, our Table(s) and Columns. But it will generate them only, if the aforementioned Java classes are in the same package as the Eclipse-generated Java class with the main method which in my case called MyCrudBackendApplication! Make sure that's the case!
Now let's just check if everything works so run MyCrudBackendApplication as Spring Boot App.
Open adminer on localhost:8888 to find customer_database and the table inside it which is called customers with auto-generated columns. Add same data and hit http://localhost:8080/api/version_1/customers and you'll see the content of the database as JSON.
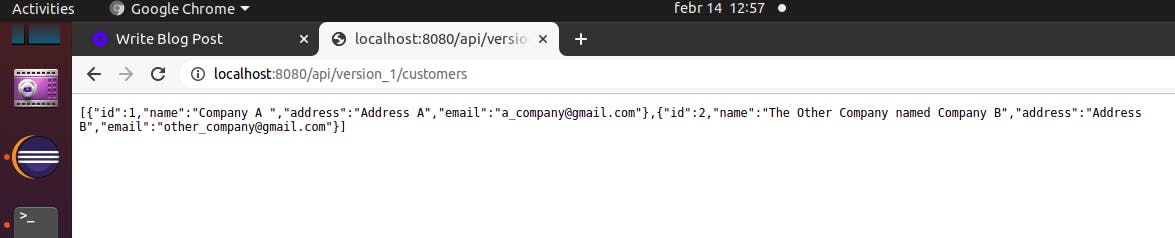 In this URL
- the 8080 port is used by the built-in Tomcat server (That's why we could not allow adminer to use the same port)
/api/version_1/refers to@RequestMapping("/api/version_1/")' parameter of the CustomerController class.customersrefers to@GetMapping("/customers")' parameter of the same class.
At this point we already have
- a working Spring Boot backend and
- a MySQL docker container.
Before we dockerize our backend, let's create the Frontend.
Creating Frontend
We make our Frontend using ReactJS.
Let's use npx create-react-app frontend to create it. Type the following:
npx create-react-app frontend
When finished type cd frontend and npm start. This launches the application on localhost:3000
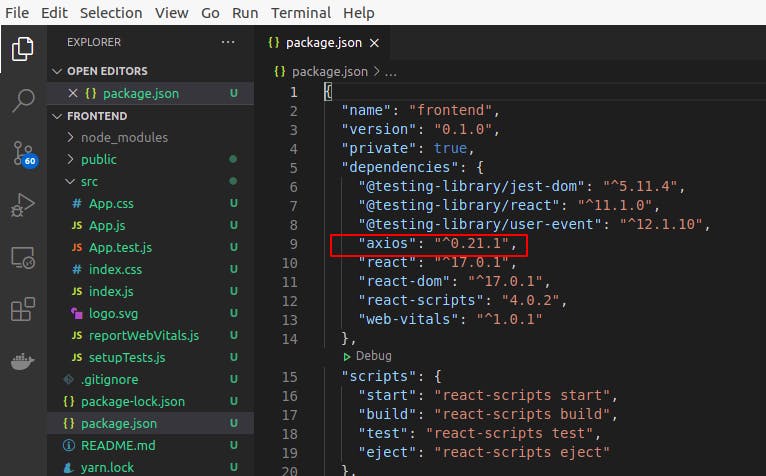
To access backend we will use the axios library. Install it
by typing npm install axios --save.
You can verify the successful installation by peeking inside package.json file(this includes every npm-installed libraries).
I also installed bootstrap just to give it some basic styling.
npm install bootstrap --save
Create a new class and name itservices/CustomerService.js. This class will contain the axios library and serve as a connection to our Backend. Fill it with the following content:
import axios from 'axios';

const CUSTOMER_API_BASE_URL = 'http://localhost:8080/api/version_1/customers';
class CustomerService {
    getAllCustomers() {
        return axios.get(CUSTOMER_API_BASE_URL);
    }
}

export default new CustomerService();
Create a new Component and name it components/CustomerHook.js. Since we are using the new function-based React, this component is not a class but a function and will serve as the home of two hooks: useState and useEffect. The purpose of this component is to call CustomerService and display the response in a table format. Fill it with the followings:
import React, { useState, useEffect } from 'react';
import CustomerService from '../services/CustomerService';


const CustomerHook = () => {

    const [customers, setCustomers] = useState([]);

    useEffect(() => {
        CustomerService.getAllCustomers().then((res) => {
            setCustomers(res.data);
        })
    })

    return (
        <div>
            <h2 className="text-center">These Companies are our Customers:</h2>

            <div className="row">
                <table className="table table-striped table-bordered">
                    <thead>
                        <tr>
                            <th>Name</th>
                            <th>Address</th>
                            <th>email</th>
                            <th>Actions</th>
                        </tr>
                    </thead>
                    <tbody>
                        {customers.map(
                            cust =>
                                <tr key={cust.id}>
                                    <td>{cust.name}</td>
                                    <td>{cust.address}</td>
                                    <td>{cust.email}</td>

                                </tr>
                        )}
                    </tbody>
                </table>
            </div>
        </div>
    )
}

export default CustomerHook
As I said earlier this component contains a useEffect hook which will be invoked whenever we update the page.
Let's replace the content of App.js with the followings:
import CustomerService from './components/CustomerHook';

function App() {
  return (
    <div className="container">
      <CustomerService />
    </div>
  );
}

export default App;
Finally, we have to go back to Eclipse and add the annotation of @CrossOrigin(origins = "http://localhost:3000") to our Controller class, like this:
@CrossOrigin(origins = "http://localhost:3000")
@RestController
@RequestMapping("/api/version_1/")
public class CustomerController {
....
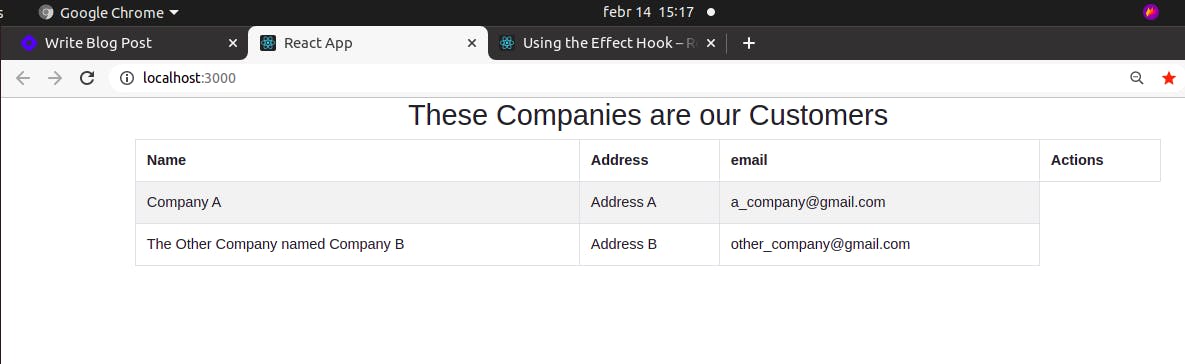
After this you can hit localhost:3000 where you'll be greeted by the content of the Database (assuming both MySQL Docker Container and the Spring Boot backend Applications are running) as a html table inside a React component. Congrats!