


The Big Picture
This is a step-by-step tutorial about integrating fast.ai's famous Bear-classifier (a Neural Network model trained to do image recognition) with Angular.
Last time we called another trained fast.ai model from a web environment and now we do this again. But this tutorial is for those who prefer Angular over React.
Here is the demo:
In this tutorial I confine myself to the integration of an already trained model (i.e I won't write about the training of the model which is already covered in great details by Jeremy and Sylvain). The application's relevant code is available on Github. By relevant code I mean the exclusion of the trained model (which is quite large and you can easily train it yourself by following the book.)
Software versions
- OS: Ubuntu 20.04.2 LTS
- node: v14.15.4
- npm: 6.14.10
- Angular CLI: 11.2.2
- Python: 3.8.3
- Flask: 1.1.2
- Werkzeug: 1.0.1
- fastai: 2.2.5
- fastcore: 1.3.19
- pytorch: 1.7.1
Creating Backend
Create a new folder and name it backend. Enter it and create a Virtual Environment by typing python3 -m venv venv. Then activate it: . venv/bin/activate.
We need to install some dependencies. Install flask and python-dotenv and flask-cors : pip install flask python-dotenv flask-cors.
Also install fast.ai with pip install fastai.
Attention! Fastai comes with PyTorch and PyTorch needs a lot of free RAM and if your Virtual Environment does not have enough, it will present a very frustrating error:
Using cached https://files.pythonhosted.org/packages/31/a4/c10f07959fd58ffd066518e3f163f55d40bc033191184a8903e660d88c03/pandas-1.2.2-cp38-cp38-manylinux1_x86_64.whl
Collecting torch<1.8,>=1.7.0 (from fastai)
Killed
Put the trained model (which is in my case called export.pkl) to the backend folder.
Also create here (in the backend folder) two other files and call them backend.py and .flaskenv. The content of .flaskenv should be:
FLASK_APP=backend.py
FLASK_ENV=development
The content of backend.py should be the following:
from flask import Flask, request, make_response
from flask_cors import CORS

from fastai import *
from fastai.vision.all import *

app = Flask(__name__)
CORS(app)

path = Path()
learn_inf = load_learner(path/'export.pkl')


@app.route('/api/image-upload', methods=['POST'])
def call_predict():

    imageFile = request.files['imageFile']
    pili_img = PILImage.create(imageFile)
    pred, pred_idx, probs = learn_inf.predict(pili_img)
    prediction = str(pred) + ", "+str(probs)
    print(prediction)

    resp = make_response({"prediction": prediction}, 200)
    return resp
In the call_predict function we create an endpoint which accepts the uploaded files (images). Inside the function the model makes the prediction. The function returns a response.
The command to start our backend server is flask run. It needs to be executed from the backend folder. Type flask run and the result should be something like this:
 * Serving Flask app "backend.py" (lazy loading)
 * Environment: development
 * Debug mode: on
 * Running on http://127.0.0.1:5000/ (Press CTRL+C to quit)
 * Restarting with stat
 * Debugger is active!
 * Debugger PIN: 311-370-368
As we can see the server runs on http://127.0.0.1:5000/. We need to remember this, because our frontend client will use it.
Creating Frontend
Make sure angular is installed. Type ng --version. If yes, type ng new frontend to create a new angular project (the word frontend relates to the name of the project, can be something else, if you prefer so). The installation will ask some questions about routing and css. In this tutorial it does not matter how you answer them.
Enter the frontend folder when the intallation is done and type ng serve --open. Now the project runs on localhost:4200
First we need a service, type: ng generate service services/Image
That will generate a new image.service.ts file in the src/app/services folder. Replace its content with the following:
import { Injectable } from '@angular/core';
import { HttpClient } from '@angular/common/http';
import { Observable } from 'rxjs';

import { Prediction } from "./Prediction";

@Injectable({
  providedIn: 'root'
})
export class ImageService {

  constructor(private http_client: HttpClient) { }

  url: string = "http://127.0.0.1:5000/api/image-upload";

  uploadImage(imageFile: File): Observable<Prediction> {
    const formData = new FormData();
    formData.append('imageFile', imageFile);
    return this.http_client.post<Prediction>(this.url, formData);
  }
}
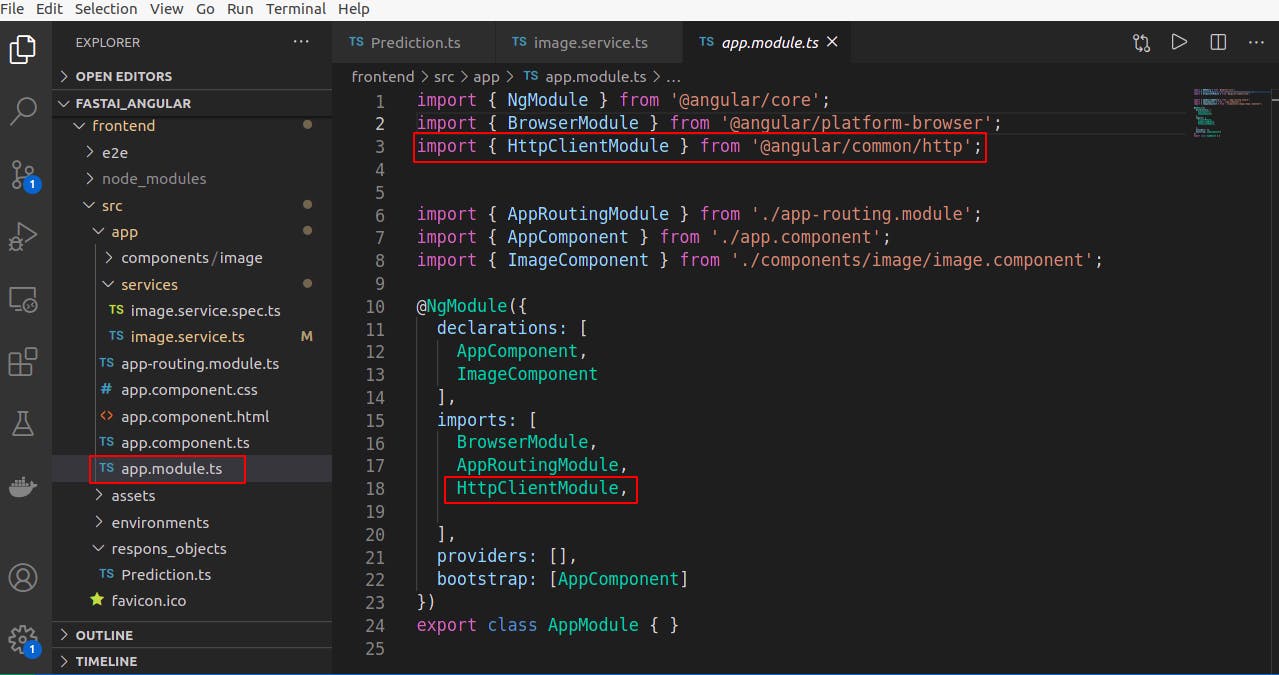
Here we specify the address of our backend in the url variable.
Note that it basically contains two parts: the first part http://127.0.0.1:5000/ is the address where our flask server runs; the second part /api/image-upload is the content of the annotation of our backend.py file. The most interesting part of the file is the uploadImage() function. It calls our endpoint (note: it uses post which corresponds the annotation of the backend.py) with the uploaded picture and returns a Prediction object (which we'll create soon). But first we need some imports. Go to app.module.ts and add HttpClientModule like this:
Now create a Prediction.ts file in the services folder with the following content:
export class Prediction {
    prediction!: string;
}
We also need a new component. Type ng generate component components/Image
To import this newly created component we need to remove everything from src/app/app.component.html and put the following there:
<div>
  <h1>{{ name | uppercase }}</h1>
  <app-image></app-image>
</div>
<app-image></app-image> refers to the selector value inside src/app/components/image/image.component.ts
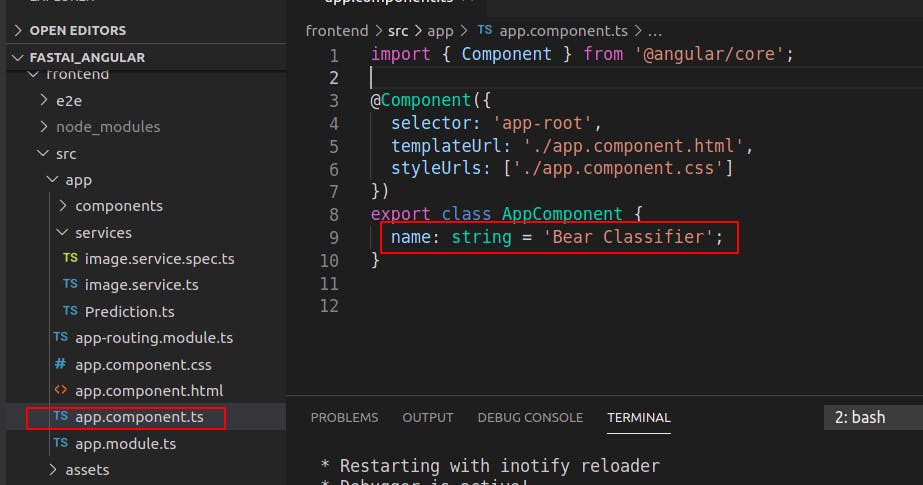
Add the name variable to src/app/app.component.ts like this:
Now if you launch the application you'll see the default message of the image component.
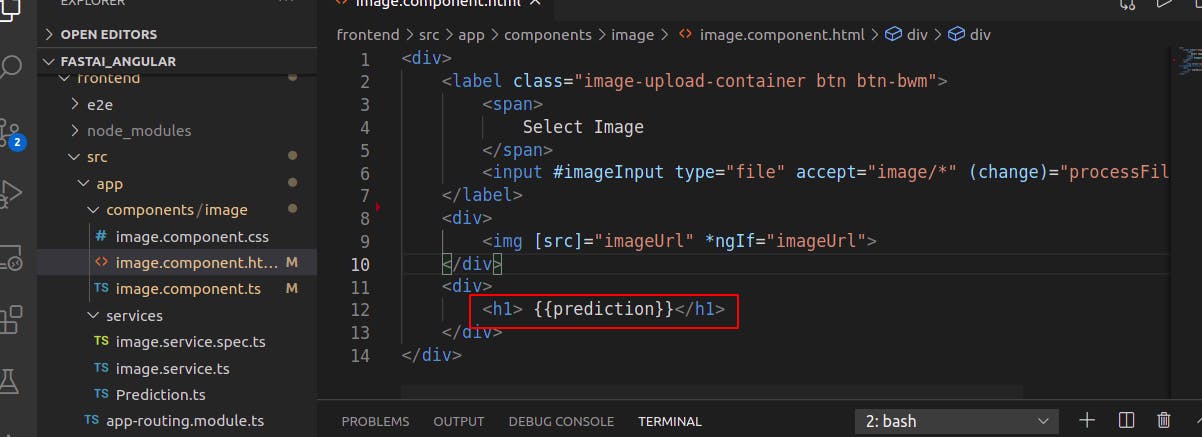
To see a more meaningful page change the src/app/components/image/image.component.html file content as follows:
<div>
    <label class="image-upload-container btn btn-bwm">
        <span>
            Select Image
        </span>
        <input #imageInput type="file" accept="image/*" (change)="processFile(imageInput)">
    </label>
    <div>
        <img [src]="imageUrl" *ngIf="imageUrl">
    </div>
    <div>
        <h1> {{prediction}}</h1>
    </div>
</div>
imageInput is the FileUploader widget. (change) will trigger a call. At the end of this call the prediction will be displayed onscreen along with the uploaded picture.
The content of src/app/components/image/image.component.ts needs to be changed, too:
import { Component, OnInit } from '@angular/core';
import { ImageService } from '../../services/image.service';

class ImageSnippet {
  constructor(public src: string, public file: File) { }
}

@Component({
  selector: 'app-image',
  templateUrl: './image.component.html',
  styleUrls: ['./image.component.css']
})
export class ImageComponent implements OnInit {

  constructor(private imageService: ImageService) { }

  prediction!: String;
  imagePath!: File;
  imageUrl!: any;
  ngOnInit(): void {
  }

  processFile(imageInput: any) {
    const file: File = imageInput.files[0];
    const reader = new FileReader();

    reader.addEventListener('load', (event: any) => {

      let selectedFile = new ImageSnippet(event.target.result, file);
      this.imageService.uploadImage(selectedFile.file).subscribe(
        (response) => {
          this.prediction = response.prediction;
        },
        (err) => {
          console.log(err)
        })
    });
    this.imagePath = imageInput;
    reader.readAsDataURL(file);
    reader.onload = (_event) => {
      this.imageUrl = reader.result;
    }
  }
}
The function called processFile is the most interesting. It gets the file from the uploading widget and basically forwards it to the service. Since it's asynchronous call, we need to subscribe. When the response (which is a src/app/services/Prediction.ts object) is ready, we assign theprediction property of the response to the prediction variable of this file. The value will be displayed on the html file, because of:
The last couple of lines of processFile are responsible of displaying the uploaded image:
...

this.imagePath = imageInput;
reader.readAsDataURL(file);
reader.onload = (_event) => {
    this.imageUrl = reader.result;
}

 ...
That's it. Although in this tutorial I showed the integration of the Hello World-like Bear Classifier model, but now you know how to integrate any fast.ai model with Angular. Congrats!